
A little belated, here is the video for the project Great Heart, created by Jim Schmitz and myself as a collaboration and presented as a final for our Phys Comp class as well as my ICM class last semester, and was also featured in the Winter Show 2017. We are still planning to take this to an art or performance context some day, to create a more immersive environment using the same concept. In the meantime, this is a shorter and more digestible explanation of what it does!
Phys Comp
Day 98 @ ITP: Phys Comp + ICM
The time has come! Our final class for Physical Computing is tomorrow. Jim Schmitz and I have been working on this project since we were assigned to work together on the midterm project in October. We have spent a total of around 10 weeks of conceptualizing and prototyping, coding, fabricating, troubleshooting, rethinking, reworking, and ultimately finalizing this second phase of our idea. I think there are various directions this project could go in should we choose to do so, and manifestations it could take in general as an idea, and many ideas that will come of having worked on it potentially for other things I do after this (I can't speak for Jim here, but I hope it is the same case for him as well!)
Today we met to finalize a few details which were keeping us from being 100% finished with the goals we had in mind for the final presentation. It was pretty down to the wire time-wise, but the last things we wanted to add though seemingly small are additions were ones that we felt would add infinitely to the user experience and conveyance and reception of the meaning of our project to someone who doesn't have us there to explain it to them. We updated the code to read the beats per minute, through registering the time it takes for a full heart beat sine wave to register, then repeating it (like a "stamp"). We decided to do this based on the feedback I got while presenting to my ICM class from Allison and my classmates about how it was distracting that the sensor would miss beats, and how it would not be unethical to fill in the missing beats through approaching it in a different way. With our new setup, once the sensor gets a new piece of information about a heartbeat it continues to play the sounds at that rate until it gets a new piece of information, which updates around every five seconds. This way we are able to provide the user with a consistent heart rate sound, which is ultimately more calming (some people were starting to worry if there was something wrong with their heart). With this method we are able to keep it steady without sacrificing the validity of the data that we are showing them/playing as a sound for them. As it is, it tracks heart rate and whether or not it is lowering, with a slight delay. The notes and flashing heartbeat colors in the visualization play at a rate set as 1 minute (or 6000 milliseconds) divided by the beats per minute, which consistently updates the rate at which the sounds are being played:

We also added a "Challenge" version, which uses this new heartbeat bpm data to track when the user's heart rate has lowered by 10%. At the end of both the "Challenge" and "Duration" options the user sees their initial pulse rate next to their final pulse rate at the end of their session.
Here are some screenshots of our current visualizations:


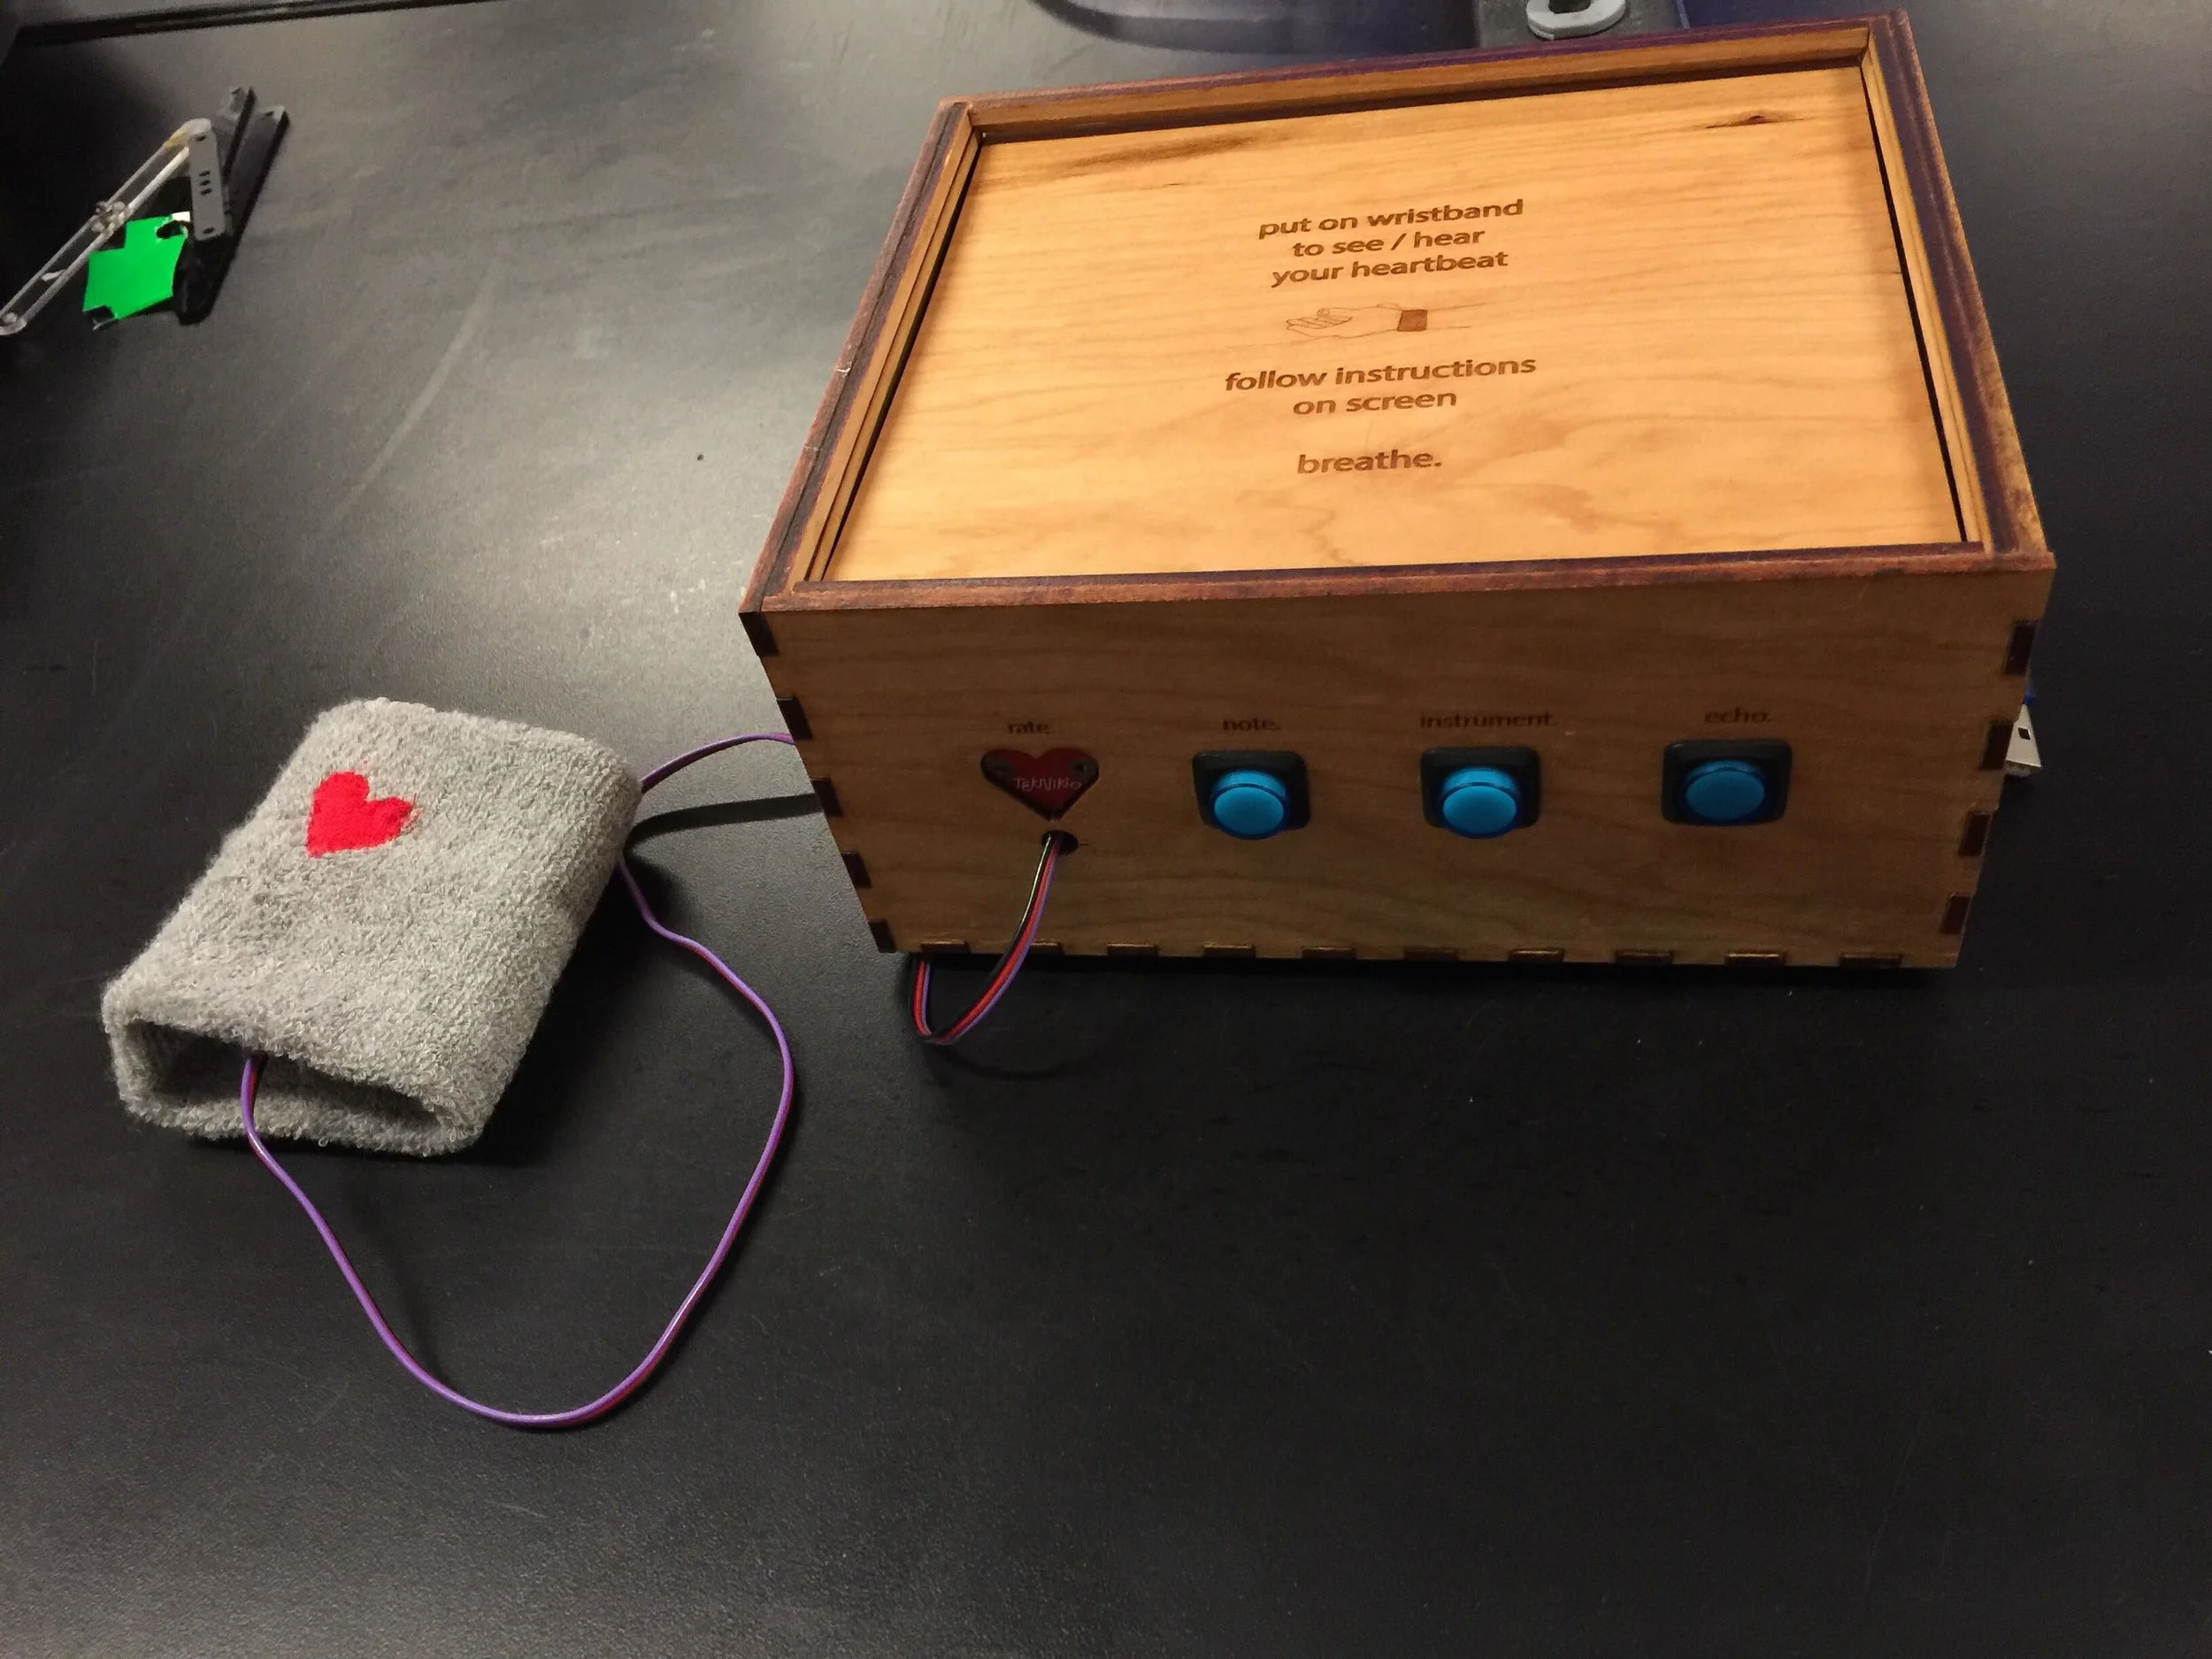
(Jim sewed a heart onto the new wristband!)
Great Heart enclosure version #2

We also recorded Jim's voice for the audio guide. We were planning to record our classmate but something came up. Maybe we will record other versions in the future if needed! And ask her again. But I think Jim's voice was actually very calming, and appropriate since we've been working on it. We decided to use a male voice also because in general voices in technology are female, though I'm not sure about instructions... In any case, we now have an audio guide, which I will also attach here:
Welcome to Great Heart.
Using your left wrist, carefully put on the wristband to see and hear your heartbeat, with the heart placed over your pulse. This is where the sensor is reading your heart rate.
In a moment you will hear notes in sync with your heartbeat. Feel free to adjust the sound using the blue buttons on the enclosure.
Lay your left arm on the table, palm facing up, and hand relaxed.
Take in a deep breath through your nose, if you are comfortable.
Press either button to start.
Choose a visualization on the screen, and breathe in and out deeply as the shapes gets bigger and smaller.
Breathe in: ...2...3...4 (Breathing sound in through nose)
And out: ...2...3...4 (Breathing sound out through nose)
Tomorrow we plan to project Great Heart through the classroom projector as well as plug into the classroom speakers. It should be fun to see and hear it big (as long as everything goes as planned)! We also found out that the project will be in the winter show which starts this weekend. There it will be displayed with headphones and a monitor. It's been very educational and inspiring to work on this up until this point. Further documentation to follow...
The code for our project can be found on GitHub here.
Day 96 @ ITP: Phys Comp
Yesterday I came to ITP and laser cut two more enclosures at a larger size (and failed to take photos of the process, but will take more later of the finished project). I made two because the wood was curved and I wasn't sure if they all would fit. It turned out that was true -- Ben Light was right, these boxes are tricky! However it still seemed like the best option for me at the moment to make sure it would stay together.
In the afternoon Jim and I met up to make some new breathing visualizations. We added a "breathing rectangle" that grows up and down the screen, and a polygon that unfolds open with your breath cycle. We also beautified the "gui" or computer program pages he had started in P5. He also showed me how to "beautify" my code! Which is also helpful to find mistakes or places where you forgot a bracket or where it is broken.
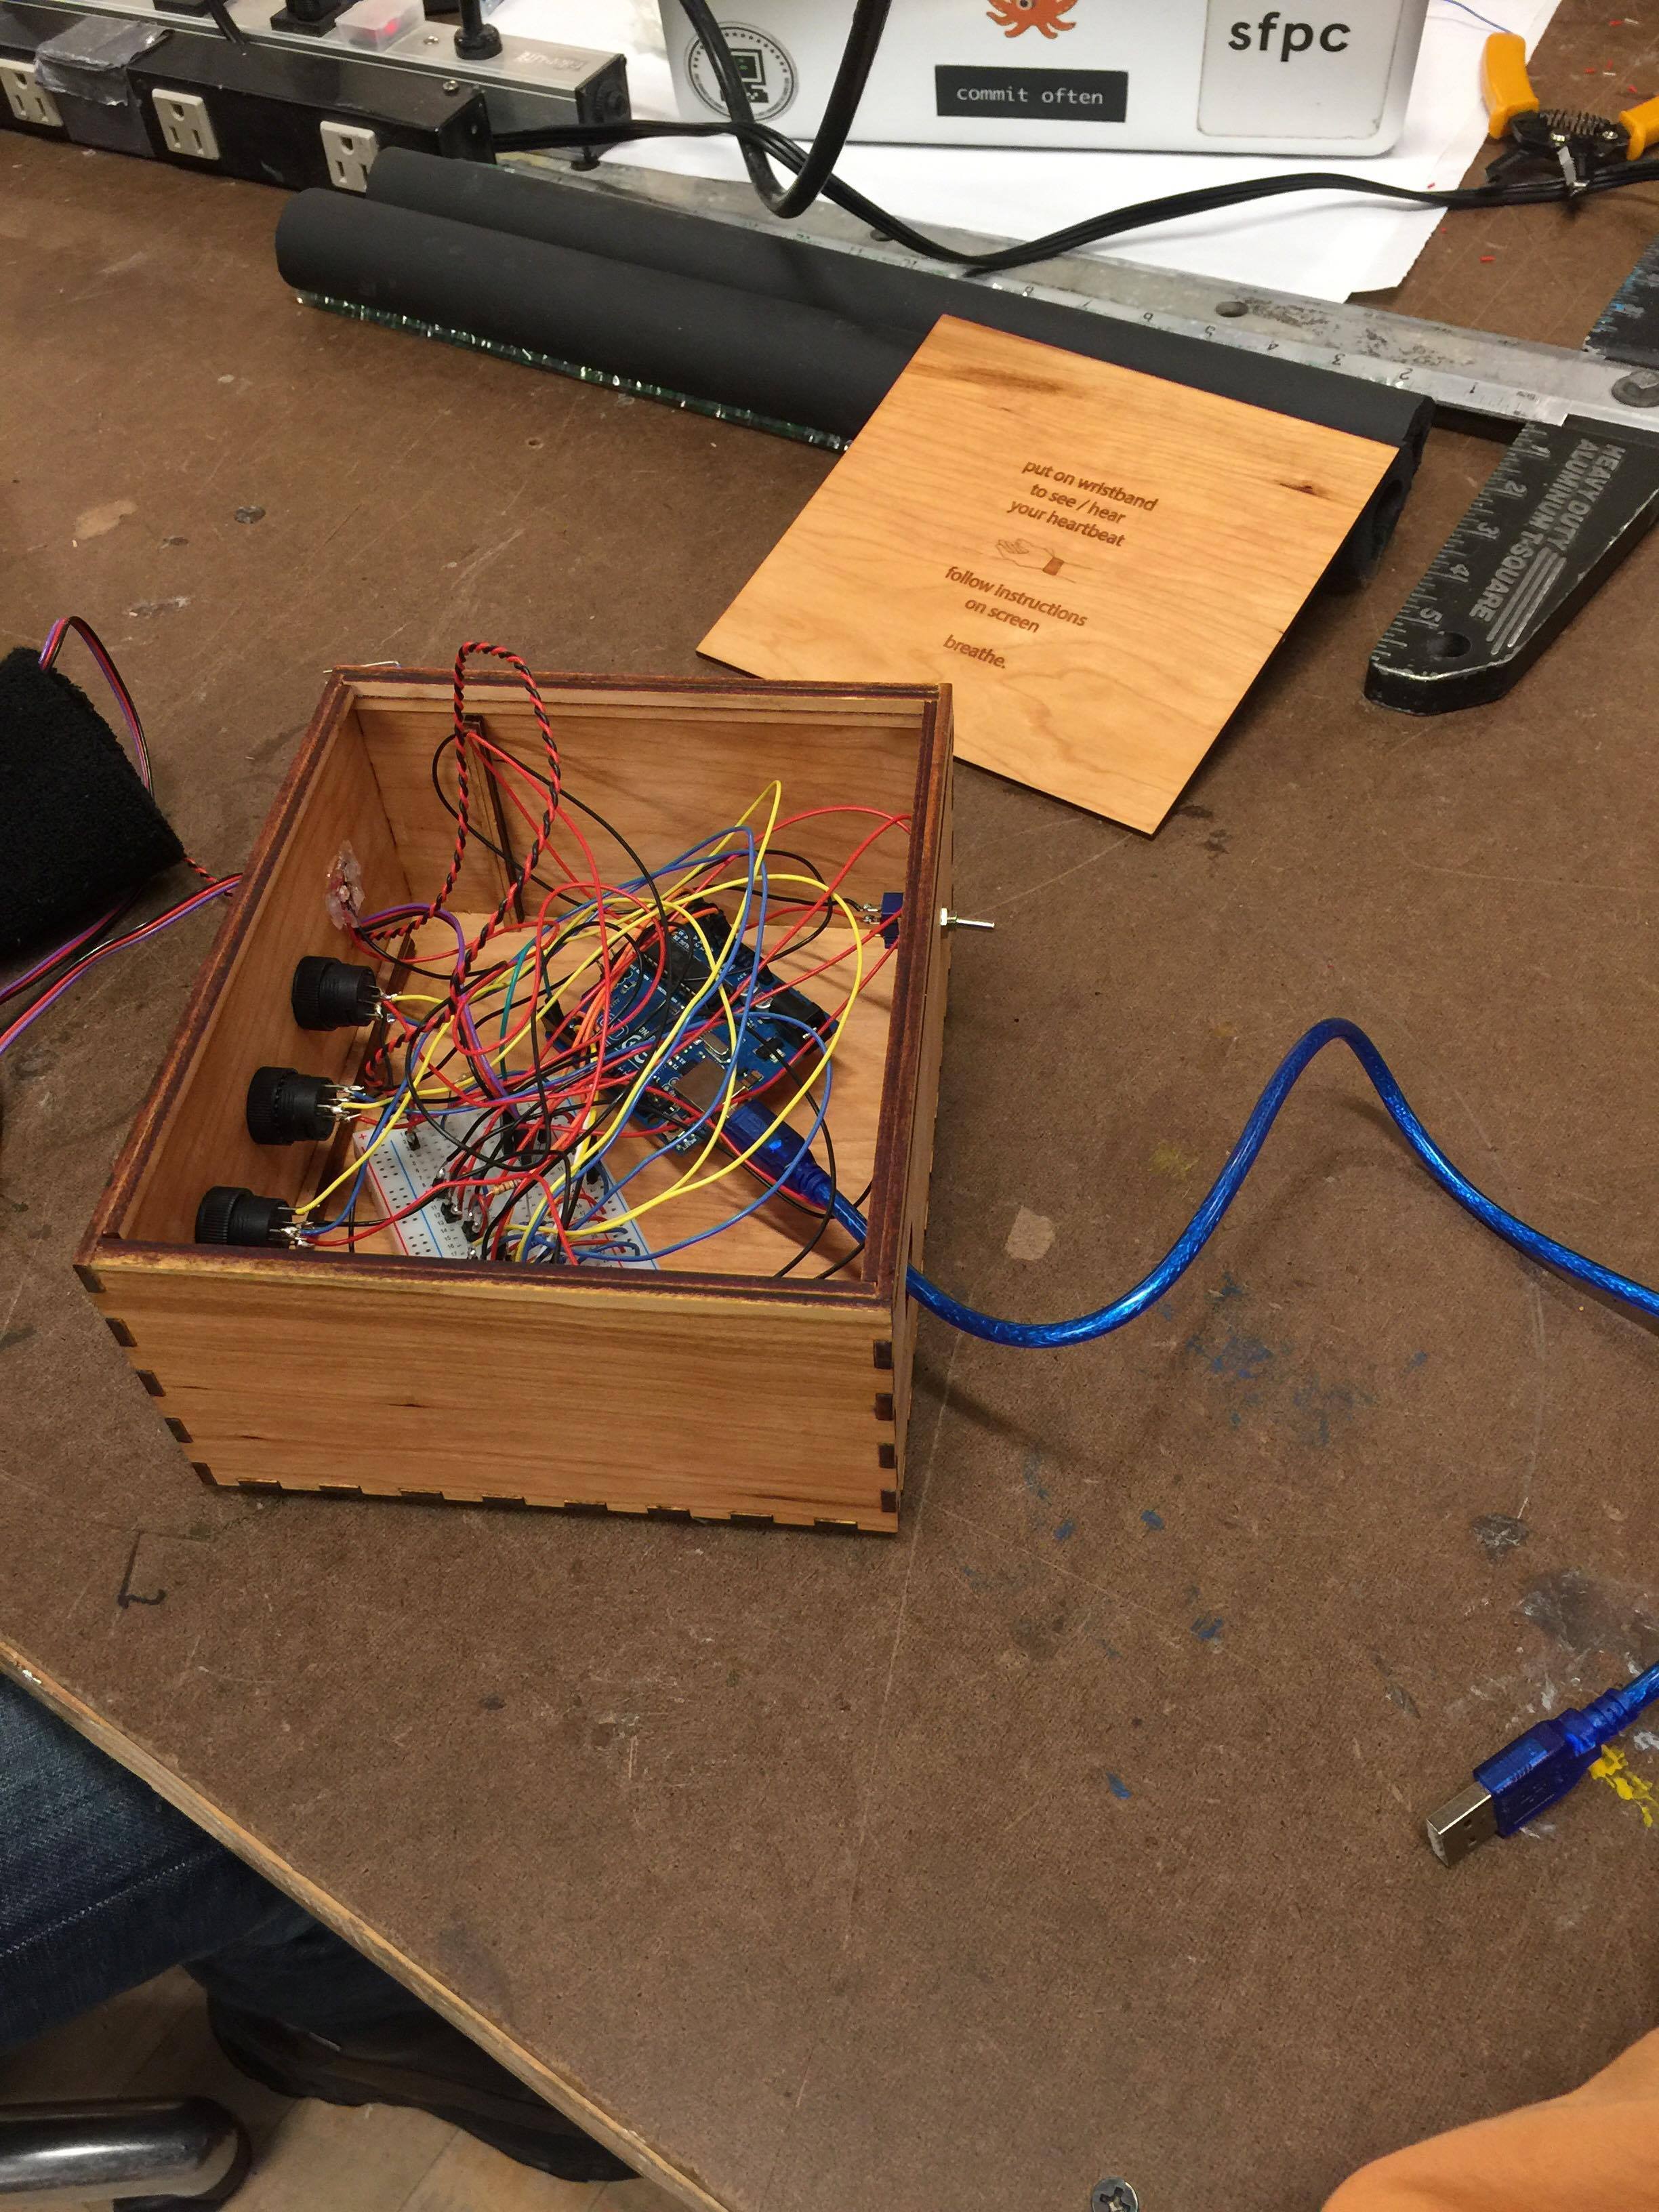
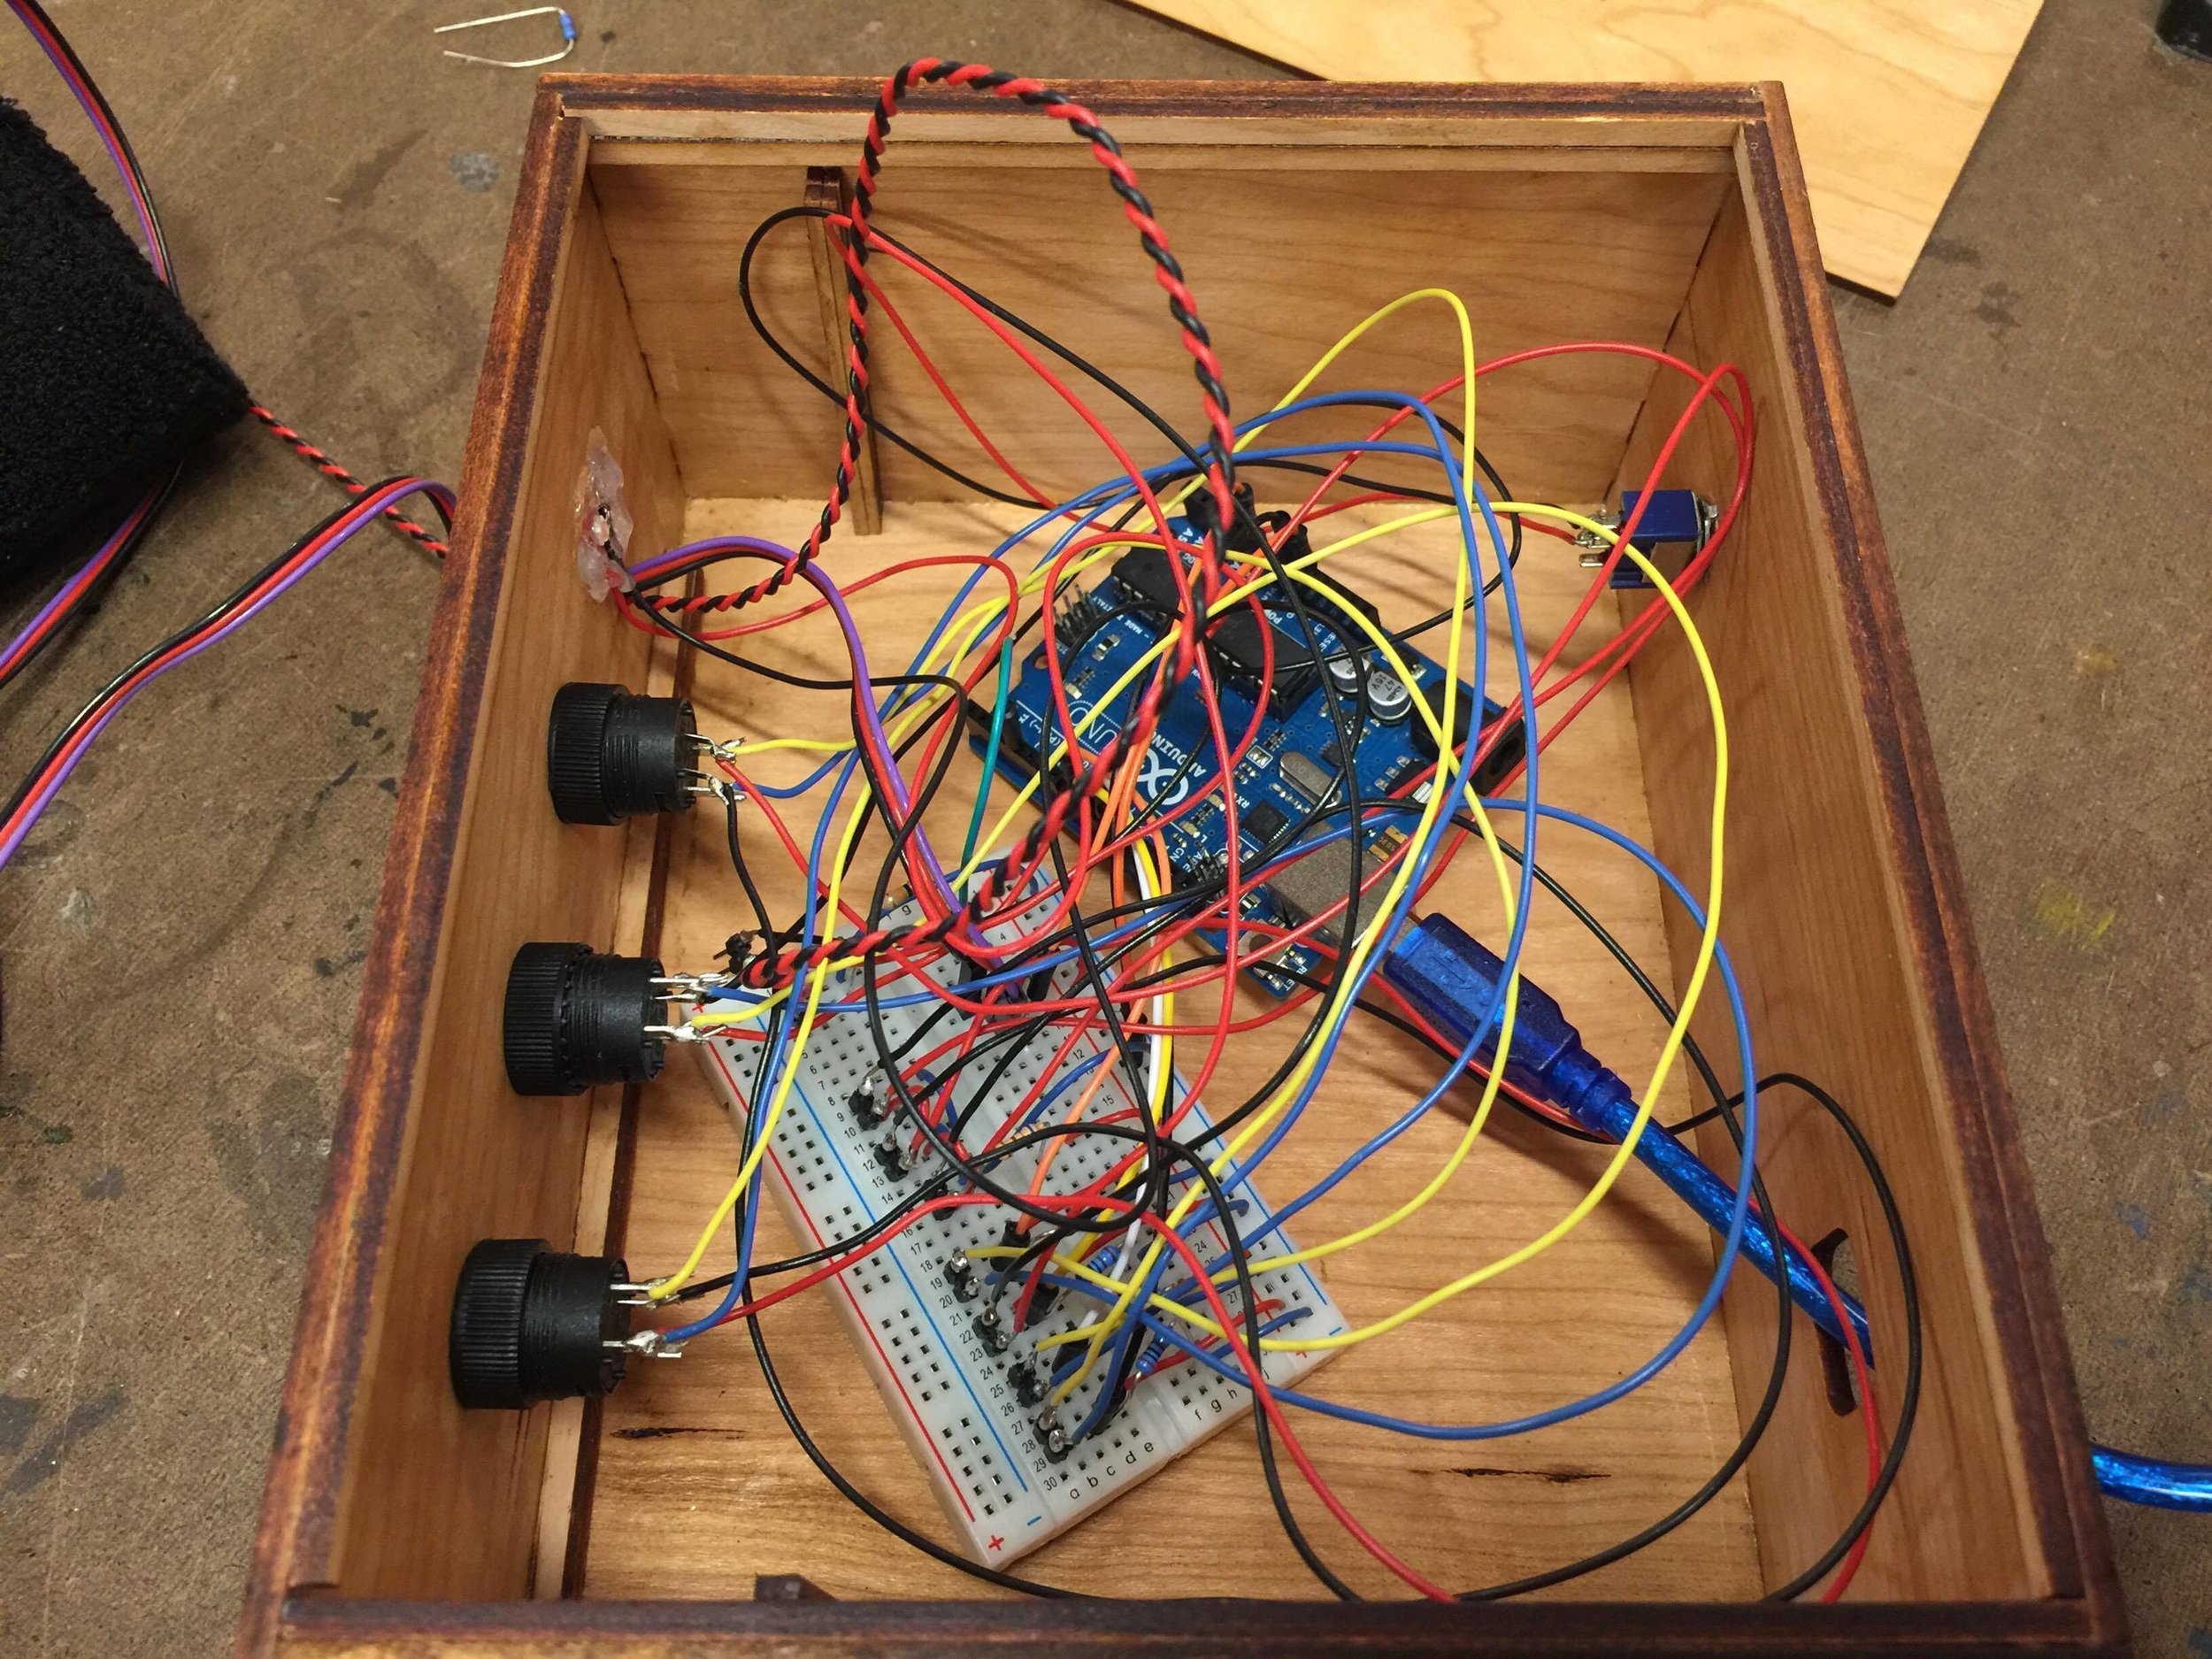
Today we met again and wired up the new enclosure. Everything fit, however I think the enclosure could still be improved upon, maybe if I use flatter wood and also take my time more with glueing, as it was a bit of an ordeal trying to glue it last night, partially bc my plan was not thought out and I assumed it would be simpler than it turned out to be. I got some glue marks all over it which I think I could avoid in the future by removing excess glue with a dry cloth.
It was helpful to wire up the new enclosure because it reminded us of how we organized the wiring on the Arduino/Breadboard, and also made it clearer how we would repeat it in the future if needed, and what we would change.
We also attempted adding a heart LED onto the wristband which would also blink with the user's heartbeat, but for some reason that is not working yet, maybe because the LED is broken? We will troubleshoot later.

Next up we will:
- Meet with Tom tomorrow afternoon for feedback before we continue.
- Troubleshoot the heart LED on wristband
- Update the heartbeat detection algorithm with Jim's reworked code to read the heart rate intelligently guess where missing heartbeats would go, to make the sound more consistent.
- Possibly add an option to view the heart rate.
- Have the dropdown menu show up when viewing the visualizations.
- Finish coding the "challenge" vs "duration" options and how those will work.
- Record audio guide
Day 91 @ ITP: Phys Comp + ICM
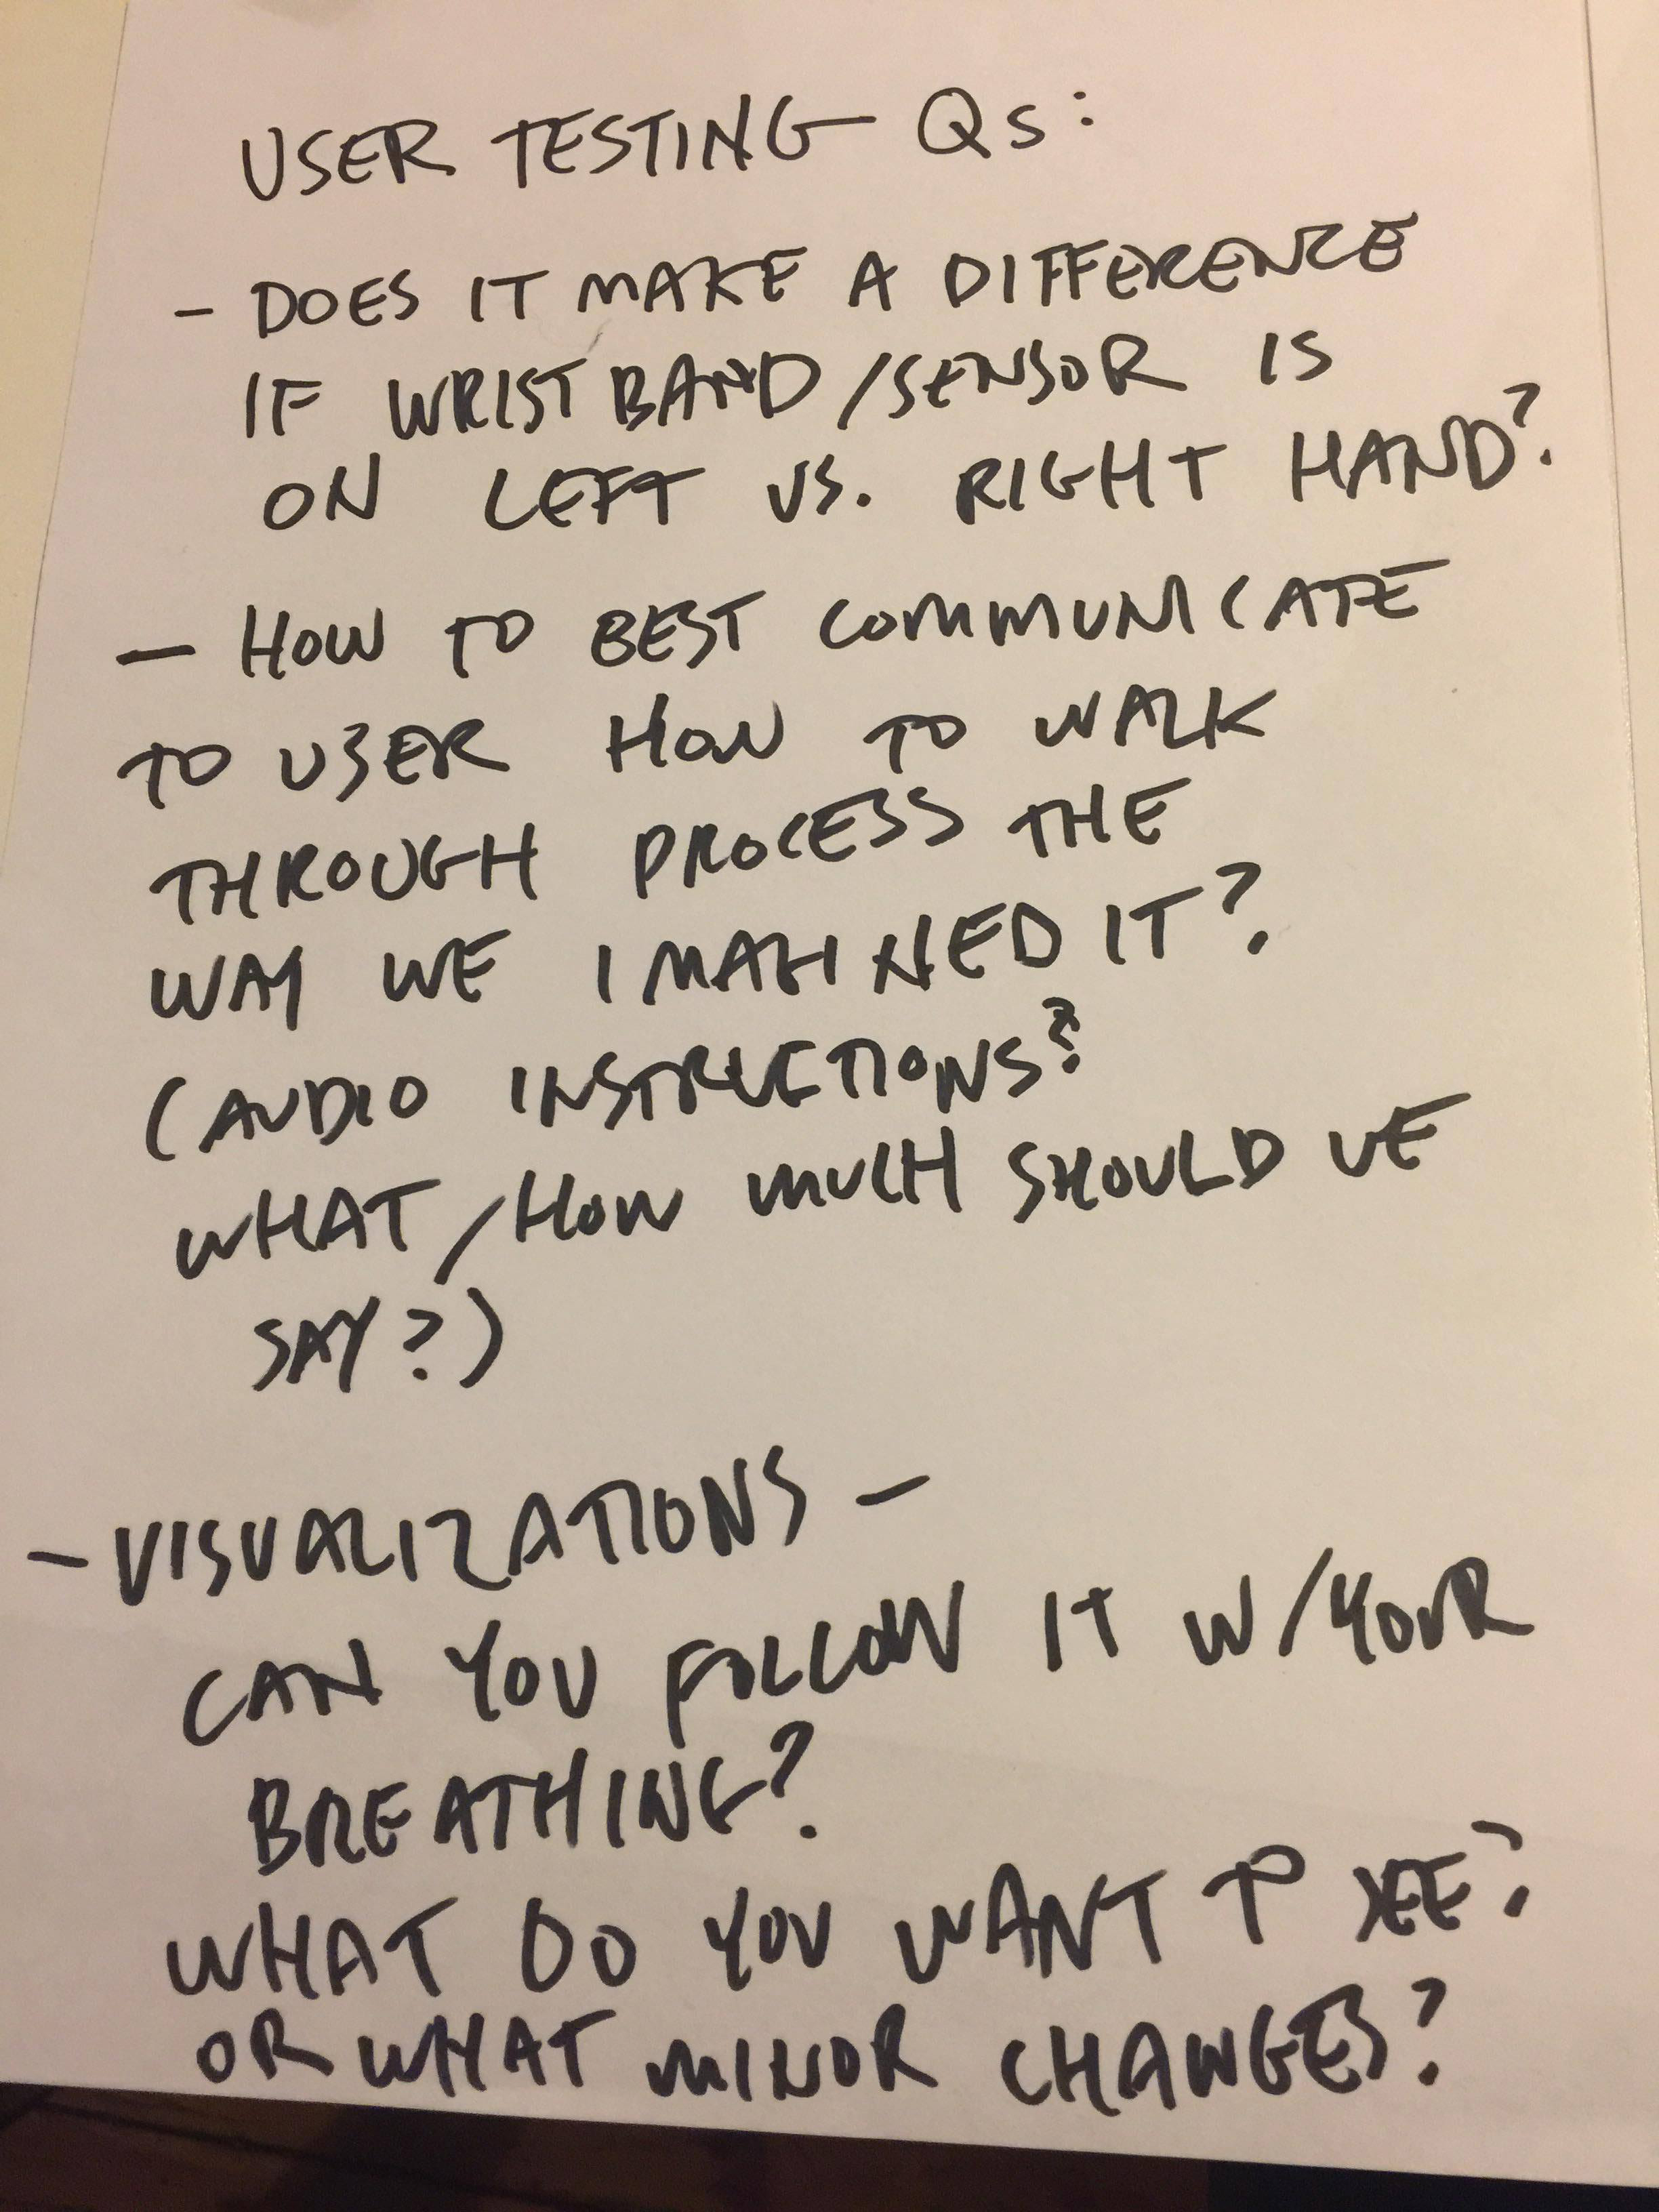
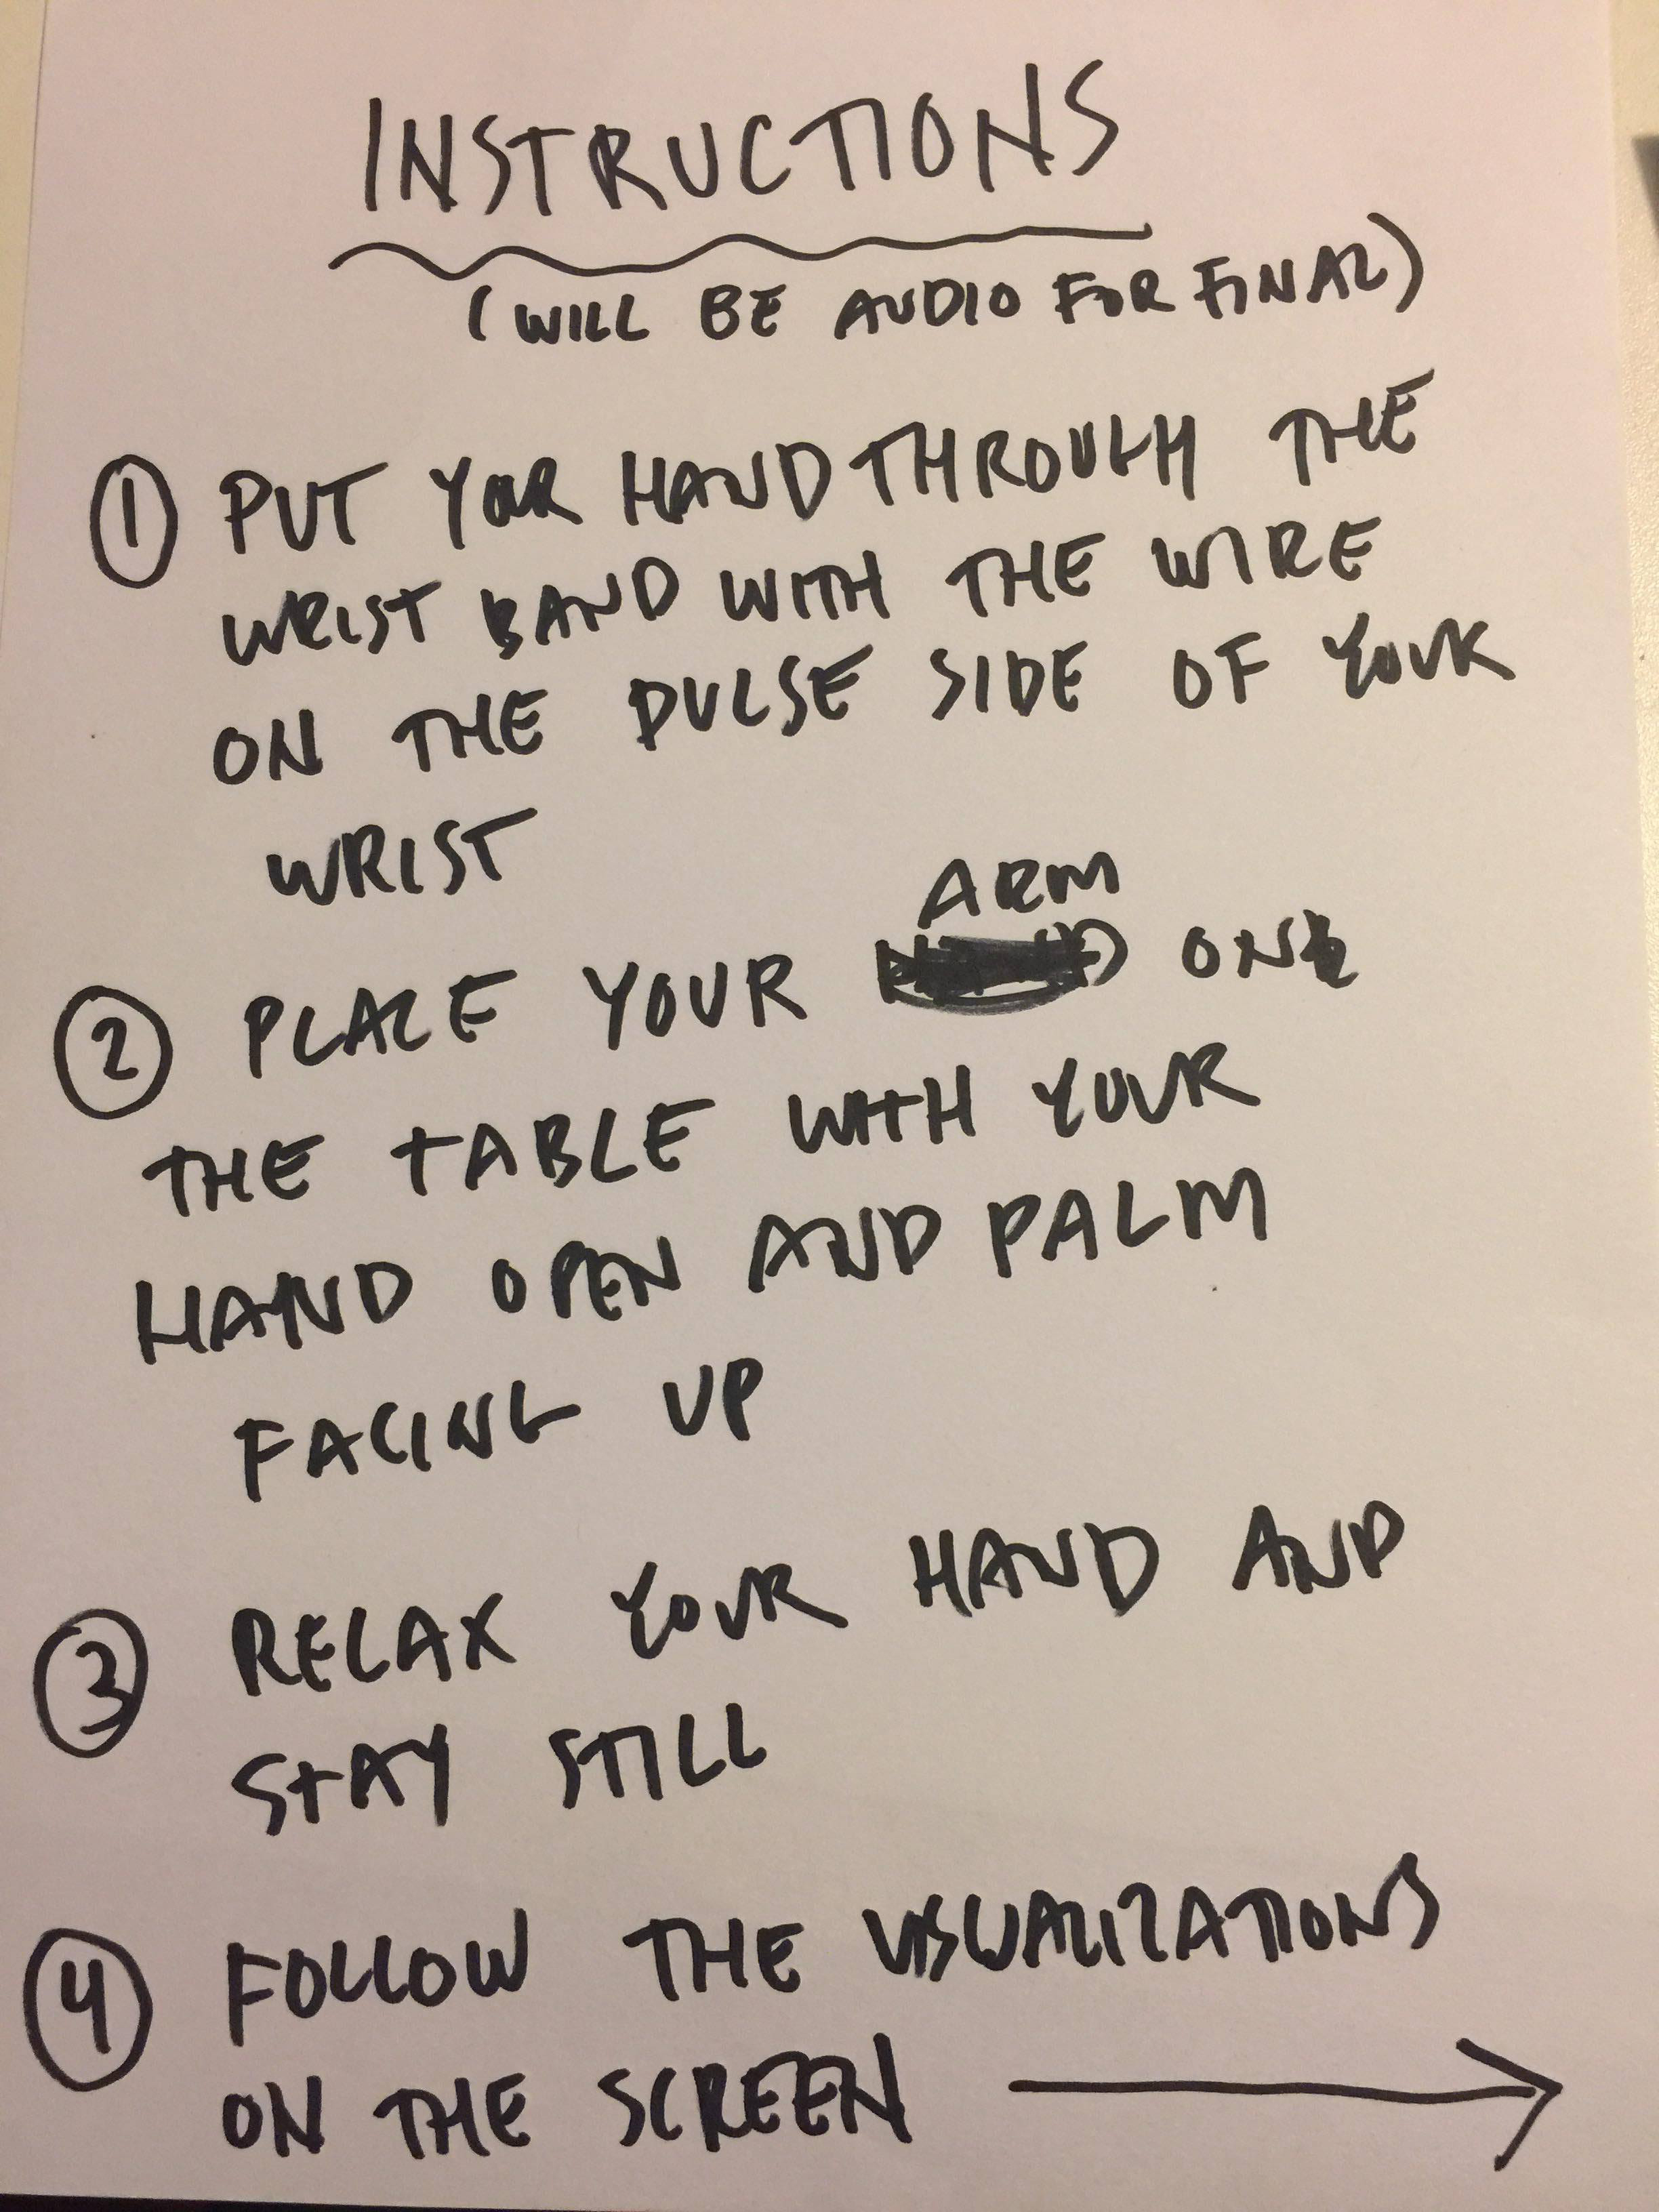
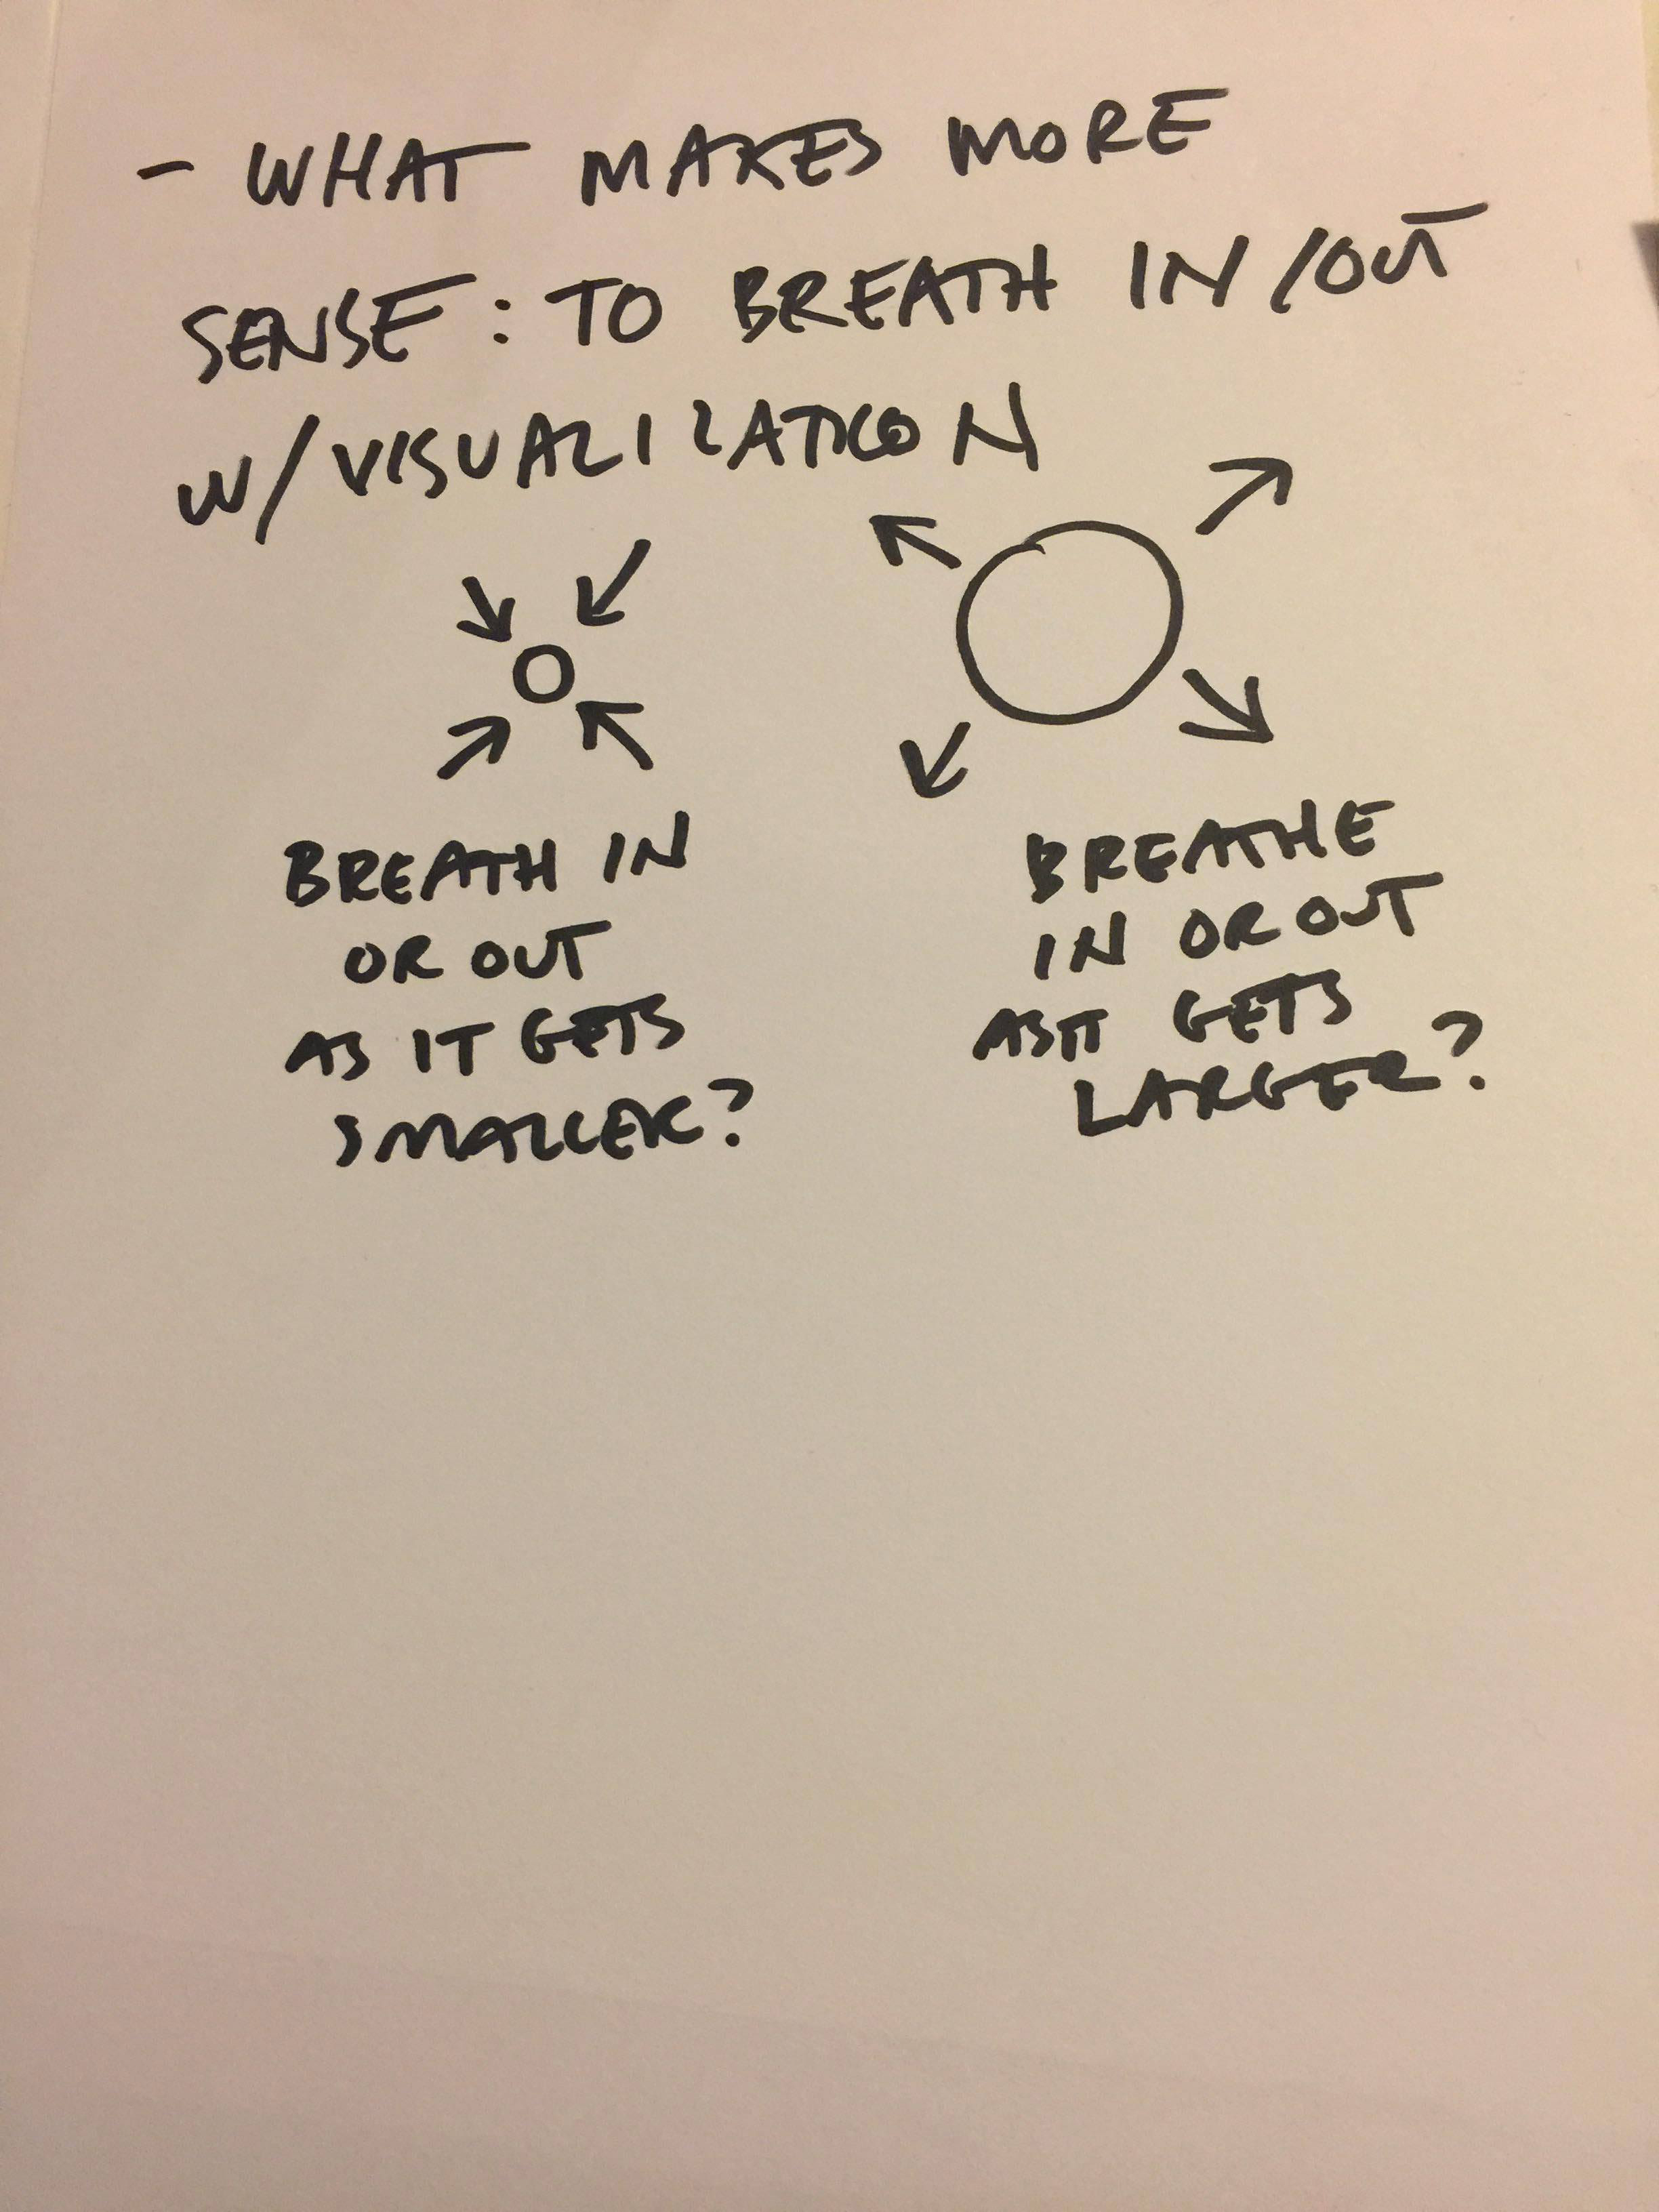
Great Heart — Questions for User Testing


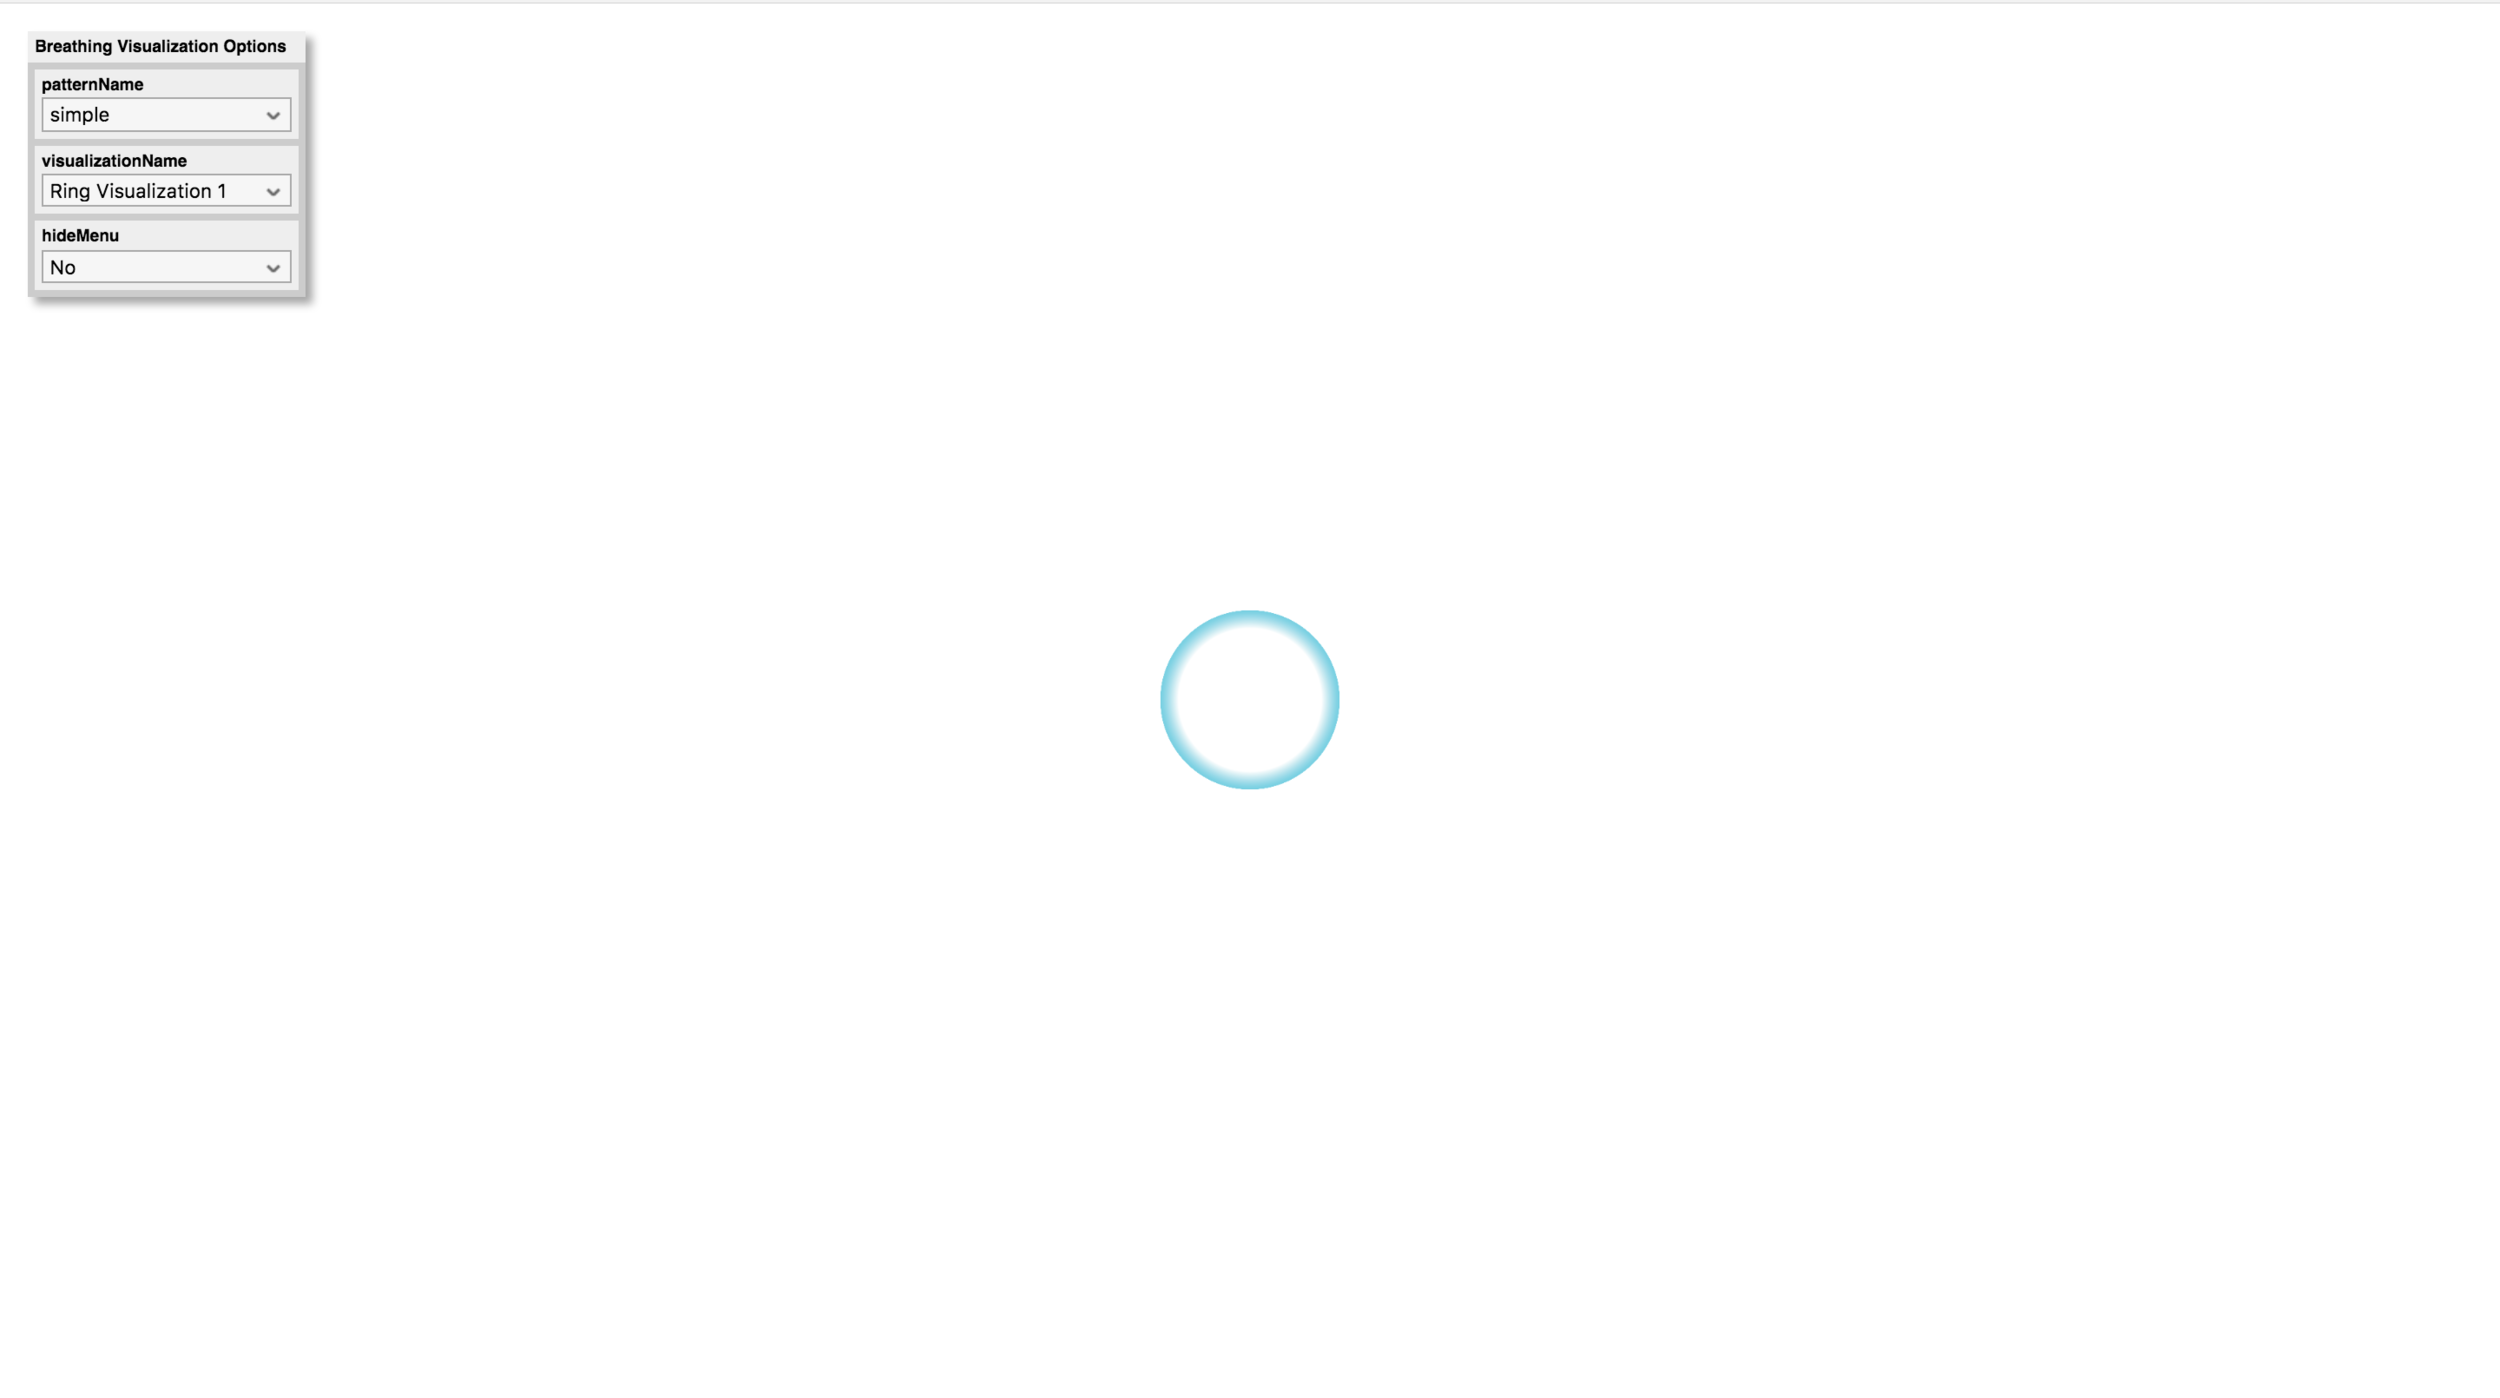
Screen shot of the breathing visualization #3 w/ blue ring (between heartbeats)

Breathing visualization #3:
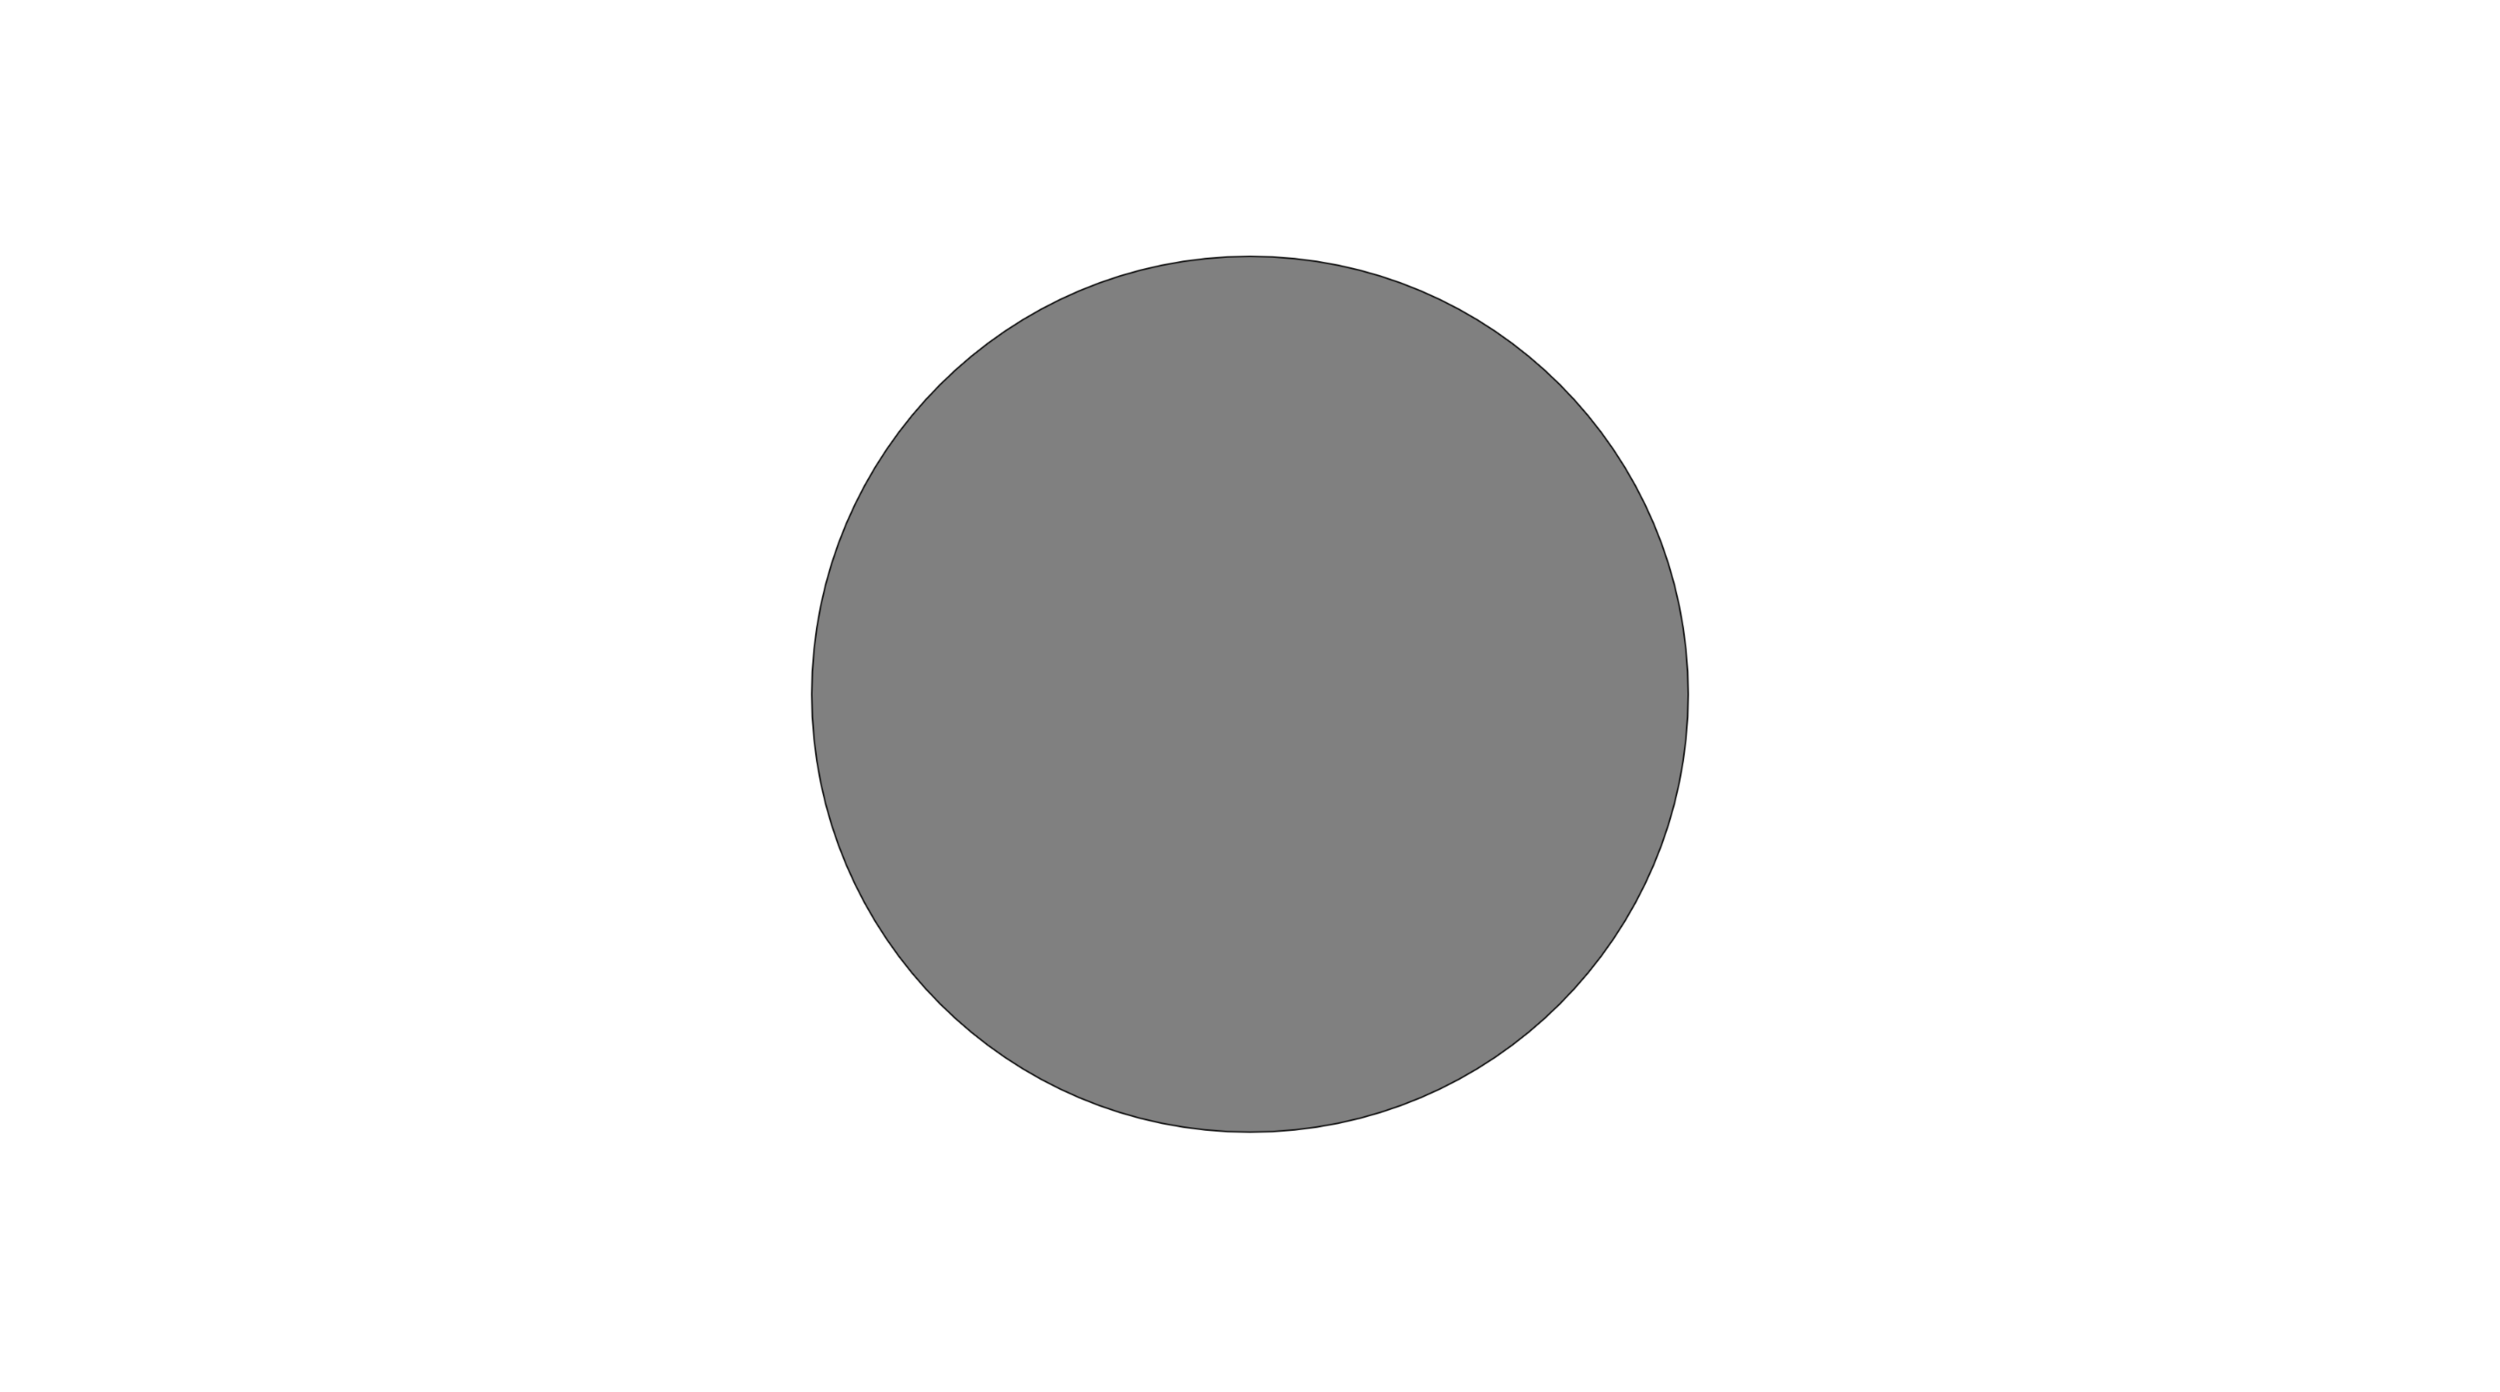
blue ring + pink orb which triggers w/ heart beat
Today Jim and I got together and coded the visualization with some new images, and made a video of our project for applying to the 2017 winter show. For now there are 3 visualizations. I will also be showing this project as my final presentation in my ICM class to share the part using P5 and also get some I'm sure valuable feedback there on the interaction...so far I have sat next to Jim and coded/typed while he explained what to do, which was extremely helpful for me-- and I hope also helpful for him to think about how it needed to be coded too? Not sure. He was very patient though. But it definitely helped with my muscle memory with coding to remember how to indent lines and add semicolons properly and put parentheses nested in the right way, etc. And also about using classes to organize code into sections, objects, and in general about simplifying code to the least amount of lines, and the syntax for that, etc. Jim's coding is very neat and simplified. I can't say that I would be able to recreate it or the math that is involved sometimes but it is starting to make sense to me, and it was nice of him to let me type. He explained how everything worked very well. At times I was able to fill in new parts on my own and other times I was pretty sloppy and left out brackets, etc, things I would not have caught for a while. So it was definitely very helpful to work with Jim on this (!) But I think we also worked well together, and had equal parts in conceptualizing it, and also both worked on fabricating it. Overall I am very proud of it and am interested to see what kind of reactions or suggestions people have!
Day 89 @ ITP: Phys Comp
I uploaded new sounds here. I also swapped them out in the code and updated it on GitHub.
Jim and I also met up today and wired together the Arduino in the new enclosure design:

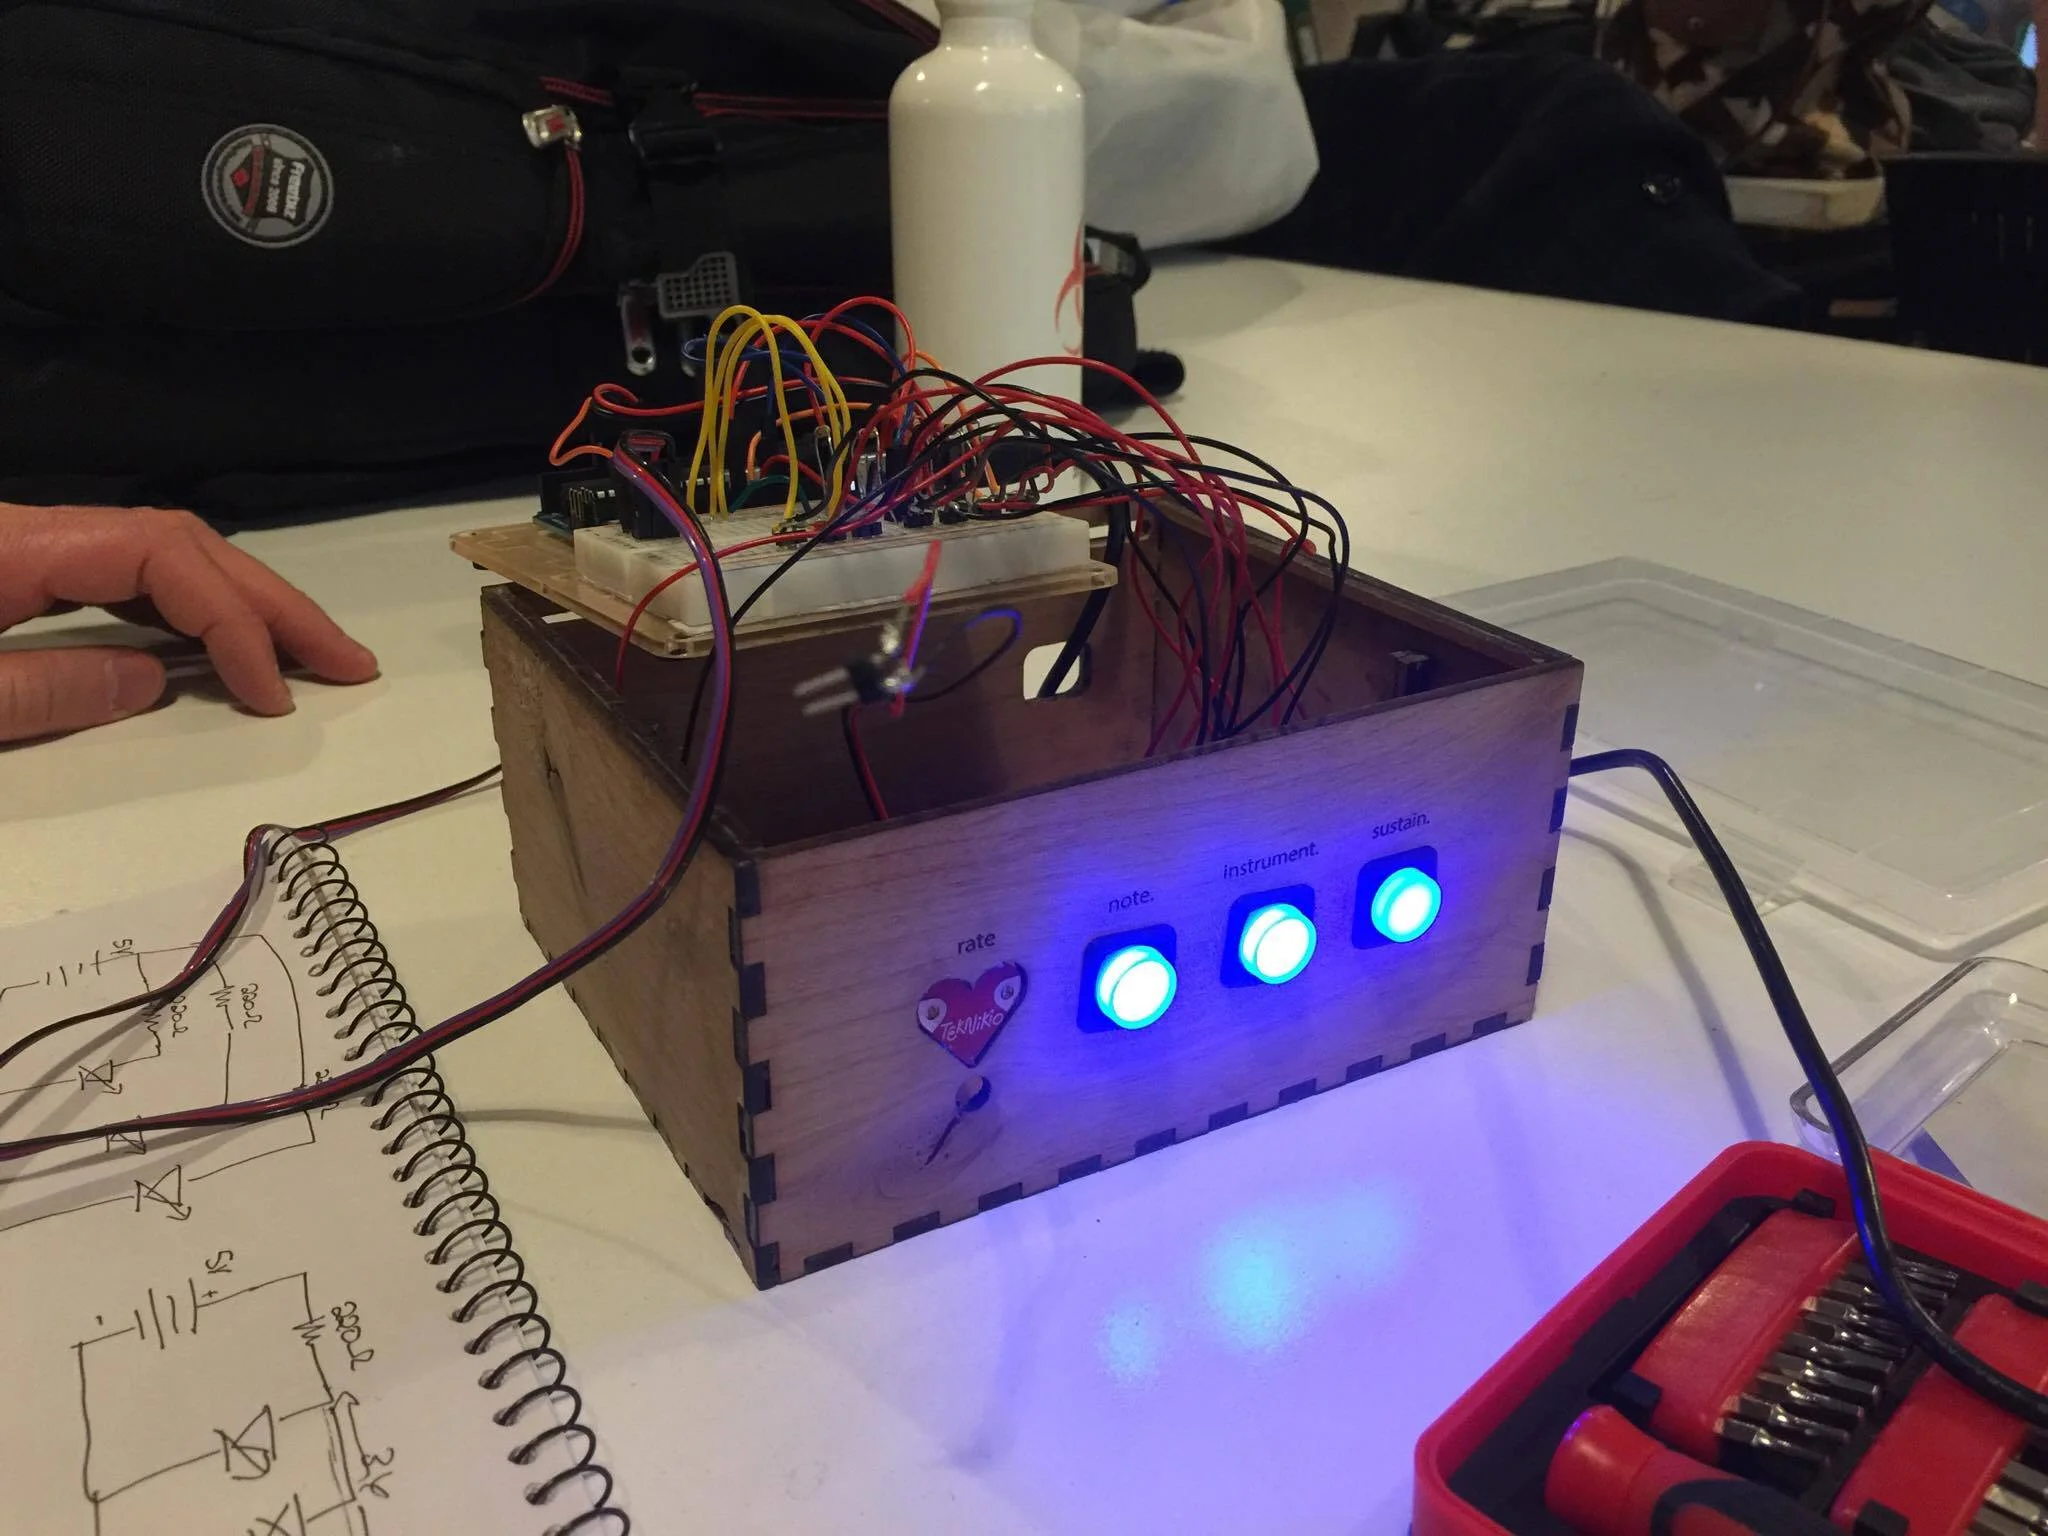

Yay, the buttons light up and they are beautiful!
Next we will:
- Implement Jim's new P5 library for more reliable heartbeat detection
- Work together on creating the heartbeat visualizations in P5
- Laser cut a new top at the correct size before Wednesday (and later in the week cut another box, or two if I have time)
- Try out using it with the wrist rest, possibly sew an LED in the wristband which could also potentially light up with the wearer's heart rate? Or, more simply light up all the time.
Day 79 - 85 @ ITP: Phys Comp and Fabrication
Here is prototype design #1 for the enclosure, made in Illustrator...these measurements are not exact (I also made the back wall slightly lower, because our idea was to have the top plexiglas slide in and out of the enclosure...) I also made the sides slightly larger to accommodate walls inside which will support the plexiglas top so this box is around 2.5" high, 5.5" wide and 8.5" long. I'm also not sure if the rounded corners will work practically. Maybe some other technique would need to be used or learned to get those or at least thicker wood to begin with and then sanding. And we may need some other way to support it from the inside if there are no screws. But this is the general idea for the enclosure for our P Comp final (which I am combining with the next Fabrication class assignment, which is to make an enclosure...if I don't have all the materials in time I will make a cardboard version at least):

And a second version incorporating Jim's feedback, this version has mostly right angle corners (except for the top plate) and a longer bottom plate to accommodate the longer irregular design we came up with (I had forgotten to make the bottom panel longer before, then fixed and edited it in again below) and added a slot in the back panel for the top plate...I'm still waiting on materials due to the shipping backup so I will be doing a cardboard mockup first then hopefully a first version of the actual enclosure this week.

Update 11/24:

I printed out a tiny paper mockup of the design and found that it is not quite right. I will need to adjust the front panel and also the length of the sides. Need to get the measurements exactly right (also of the buttons) before cutting into the wood...
Also waiting on these light up buttons for "note" + "instrument" (momentary) and "sustain" (on/off) buttons, this switch for power off, and these LEDs for the heart rate.
Light up buttons 16mm

Toggle button 13mm

Product Dimensions: 32.9mm x 13.1mm x 12.0mm / 1.3" x 0.5" x 0.5"
Product Weight: 5.0g / 0.2o
Heart LED

These arrived today! So will be able to measure.

Update 11/27:
We met on Sunday and rethought the design together. It seemed that having the protruding front panel was a little advanced to be sure that it would hold up with the buttons on it being pressed constantly, and my designs were not really that well thought out to ensure that it wouldn't break. Before we met I made the above sketch going back to the original design. I actually thought it might help to go back to the slotted design to reinforce the box which would also require keeping it square (sorry Ben, I know you hate them!!) because it seemed to work okay for the cube I made for the last Fabrication assignment, and because it would add some stability considering I didn't have a great backup plan for if it needed reinforcements, especially in the area with the buttons which will be continuously pressed and would need to be sturdily placed. I basically would like to make this very simple and durable for use after the final is over as well (and make two of them!) for us both to use and test out meditating with over the break and beyond hopefully, so it shouldn't break. So simplifying the design seemed like a better way to make sure that happens at least for this project's timeframe. I have been thinking in general about other manifestations this project could take, also with some input from friends and classmates, like making it a standalone hardware/light/sound creating piece of hardware (like a phone app but without the phone and would not be an app, but sort of light and sound driven meditation device or object) or also different instruments that could be created this way, but that would be for later on. In my time at ITP it would be fun to work on at least one musical instrument project or something that could have various iterations with a similar vocabulary or way of being built. But I digress.
Jim and I came up with a design that is very similar to the one above, but with the buttons placed on the longer panel. We will add a ridge inside and top frame for the plexiglas plate to slide in and out, thereby making it easier to open up and to fix anything with the electronics inside.
I will start laser cutting tonight (I mistakenly left it this late because I did not realize ITP would be closed over Thanksgiving week, but maybe it's for the best as some small design changes happened, and hopefully now it will be easier to complete without wasting a bunch of materials).
I'm starting in general to think about ways that various similar things could be made with the same parts. The only more expensive part at this point seems to be the Arduino, but maybe some of them wouldn't need an Arduino Uno but some smaller microcontroller in order to work. I will leave a bookmark here to come back to that idea later.
Update 11/28:
I booked two hours on the laser cutter today and brought the design that Jim and I adjusted together on Sunday. The wood and buttons had arrived so I was able to measure the holes for the buttons and adjust them. I had some issues with the power settings on the laser cutter resetting a few times while printing, and also misremembering the speed once, so one or two pieces took longer to cut before I realized that this had happened. Otherwise following the settings in the document on the Desktop of the laser cutter's computer worked fine and I am getting the hang of how it works. Still want to experiment more with the wood shop, but this seems good for doing finer work like cutting openings for enclosures like this. Though it took a while to cut through 1/8" pieces, and I wondered if actually a 1/4" board would have been sturdier, and if maybe I should have used the 75W cutter to do it that way? Otherwise, the slots do fit (we flipped some pieces around to get the text in the right places), and it's a little too big for the Arduino + breadboard but also won't be sure of that until we add the inside supports for the top and all the wires, so at least it's definitely not too small. I think it would be nicer if it was more compact but that's just a visual side note and could be adjusted later for the next one.
Most importantly I already snapped off the ledge above where the top plate is supposed to go in/out, so that is a bad sign and will need to be fixed somehow or rethought design wise. I think one side snapped when I took out the piece in the slot which had been laser cut out, and the other side snapped when I was seeing if the acrylic would fit through (it did fit, but it seemed a lot heavier compared to the 1/8" Alder wood hence it breaking). Another solution would be to have a wooden top, which is definitely an option, especially if that seems more long lasting. I got this 1/8" Alder wood because it was recommended for laser cutting and also seemed thin enough to do a full box almost in a short amount of time on the cutter, but I think in the next iteration of this enclosure I will be taking into mind all the problems that came up with this first one. I also got some 1/8" Cherry wood and am wondering if that would be sturdier also. Again having more time on the laser cutter would have helped of course but everyone else is trying to finish things too for finals and a 2 hour chunk at a time seems reasonable as you are watching it and standing there the whole time... once I get a real plan I think I will reserve some hours at an off time, like 9am Saturday morning or something just to finish it properly and have extra time if something goes wrong. I think as I do more of these kinds of things I will gain a better vocabulary of tools for putting things like this together and using the right materials and steps in the process etc. On a positive note, the heart LED fits! We used the "boolean union" option in Illustrator to combine the shapes of the two sides I traced, and it actually fits perfectly now. Next we will sand down the 3 larger button holes as they are still slightly too small, but thankfully Jim has some tools that will help with this, and wiring the Arduino with the buttons and the LED and the heart sensor (which will be attached to the Arduino through that small hole under the heart shape), and programming the buttons...


<~~~~~~~~~~~~the broken piece
Also need to decide for sure where the Arduino will be placed to adjust where the openings will be accordingly.....
Update 11/29:
A little late on this update, but I did glue the enclosure together last night, which was a bit messy. I met up with Jim yesterday afternoon and he helped to file the holes for the 3 larger buttons so that they would fit properly, using a needle file (pictured to right!) to sand them larger it in a circular motion. It worked, but it was too labor intensive and in the future I will definitely just make those openings a little wider and keep in mind that I should size up a little bit... maybe a couple of mm?. Also maybe I should get some of these for fixing irregularities so things fit etc (I was using scissors on a few pieces, which was not ideal). These are the readings I got when measuring the buttons with the caliper:


I did measure around the part with the threads, but it was still too small. The buttons also fit with the cardboard prototype at this size but not with the wood, I'm assuming because the wood has no give.


The heart LED is staying in without any support at this point, which is nice! We will have to reinforce it with some glue somehow, which will close up the gaps. If it doesn't look right when lit up maybe we can also add the plastic behind as Ben suggested below, which could make it seem more solid I would imagine...
Other notes: I think the box could have been a bit smaller and less clunky feeling, also more solid feeling. And the top in acrylic doesn't look quite as integrated as I imagined so maybe design wise wood would be better for that as well. It would be great to try various iterations of enclosures that could be swapped out in different ways or used with different sounds and the same setup, in different sizes or something like this. Acrylic seems more durable but wood more fun to work with in general (except for maybe using acrylic to create see through parts/colors/having things light up/playing with colors or transparency ?) -- just need to find the most sturdy one to work with as this board snapped in a few places pretty easily after being cut, or maybe just going up to 1/4" or 3/8" (possibly from this link) would fix that. However I think I would need to upgrade to a higher powered laser cutter as it took 4-5 times to cut through 1/8" on the 50W laser cutter which ends up taking a lot of time.
Day 78 @ ITP: Phys Comp
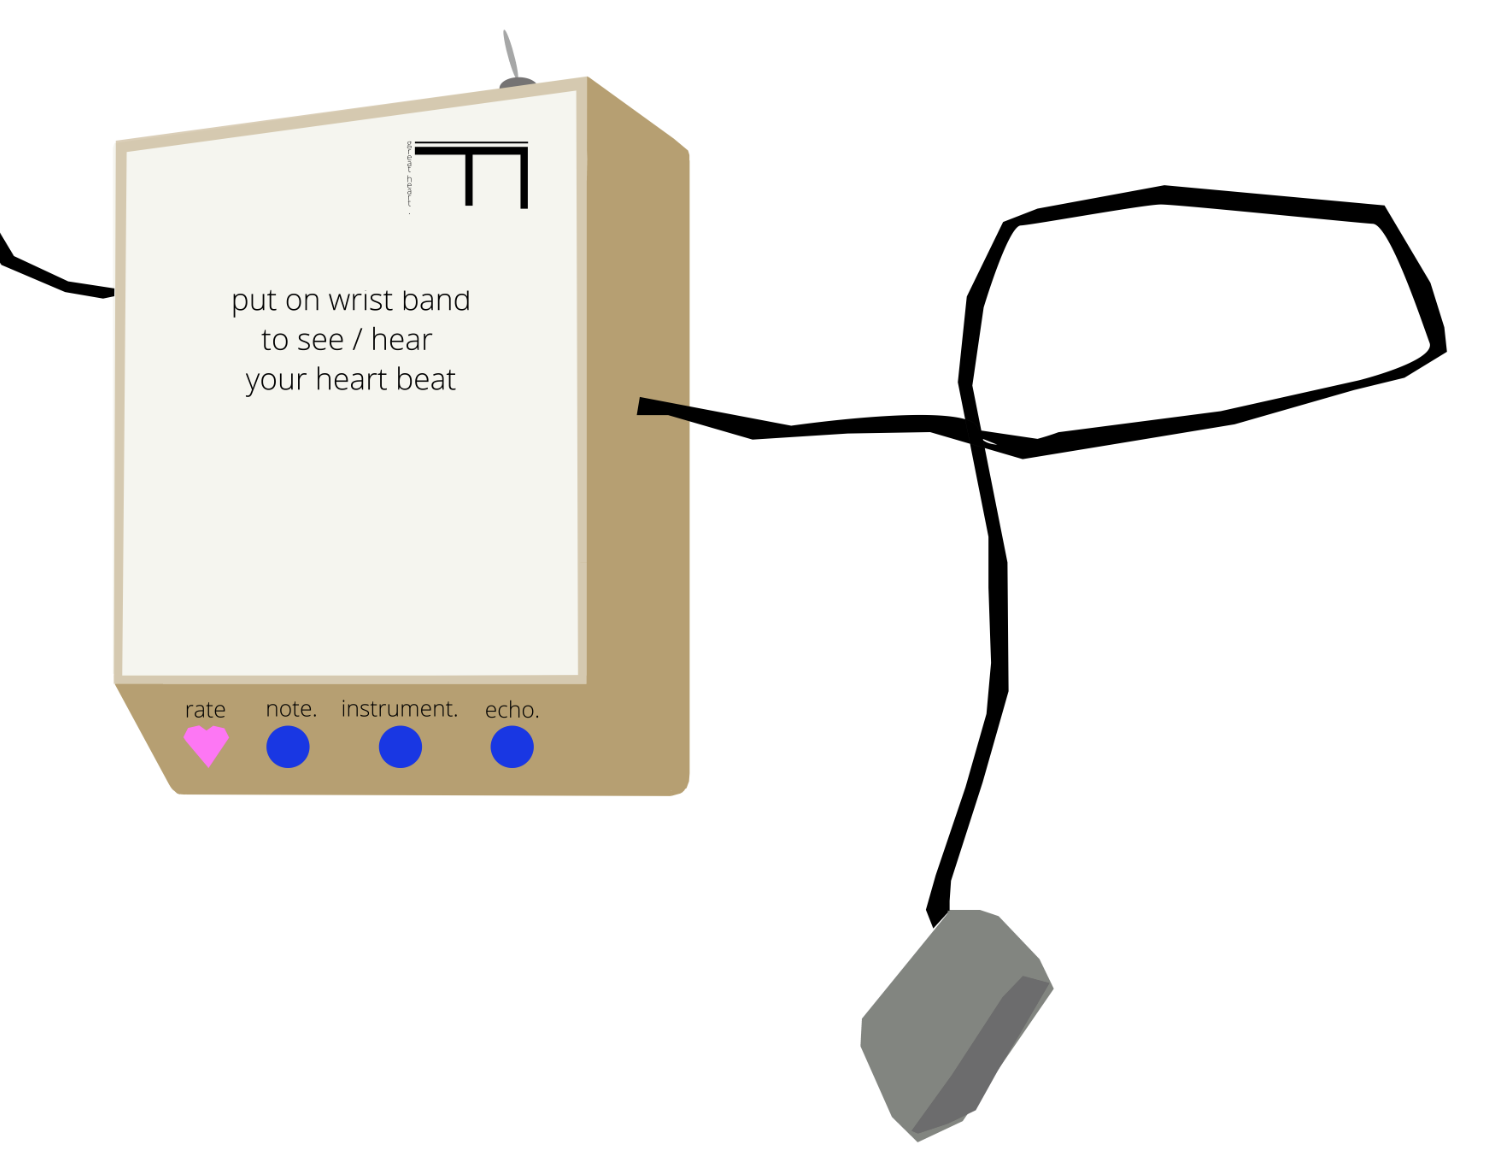
It will look something like this...with a new logo design by Tristan Martineau. I'm not sure what it's called- "great heart"? Not sure yet if this is what the text will say but we will need some kind of instructions. How to have people know to meditate with it without scaring them off by mentioning meditation? This is a particularly cartoony envisioning of what we will do, but something like this:
What is left to do:
- Designing the enclosure for print using Illustrator
- Laser cutting the wood and plexiglas for the enclosure
- Building the enclosure with buttons and the heart LED
- Sewing the sensor into the wristband
- Continuing to work on the code for heartbeat detection and doing user testing
- Finessing the visualizations and how the breathing exercises will work in P5
Day 68 @ ITP: Phys Comp
Timeline for working on our Final Project (Camilla and Jim)
WEEK 1: Prepare for playtesting.
Our diagram about how the new version (P5 Meditation - working title) will work! Before playtesting. (Click to enlarge)
Last Tuesday night before the playtesting we sat down and created a diagram of how we wanted our new version of the MIDI Meditation (working title: "P5 Meditation") would work. We ended up deciding to use P5 to store and trigger the sounds instead of using MIDI and software because we were having issues with using MIDI commands that would work cross platform for both OSX and Windows, and also this way the whole system would be more streamlined and also require less expensive software to use (and it will also be more modular and changeable based on what we end up wanting to do with the visualizations).
This way we can also just code the Arduino once to take in and send data to the sketch and make adjustments on the P5 end (and get better at using P5 and serial communication!) We decided that the user would have a choice of a few breathing exercises from a drop-down menu, and that we would use our feedback from the playtesting to figure out how that should work.
This way we can also just code the Arduino once to take in and send data to the sketch and make adjustments on the P5 end (and get better at using P5 and serial communication!) We decided that the user would have a choice of a few breathing exercises from a drop-down menu, and that we would use our feedback from the playtesting to figure out how that should work.
Our notes from playtesting... (Click to enlarge)
Our notes from playtesting part two... (Click to enlarge)
Using Processing to begin with we created a simple visualization of the breath that looked like a wave or water that filled up the screen and then subsided based on when you breathe in, hold your breath, or breathe out. People seemed to not respond to this so much. In fact we had a few people all have the same reaction, which is that they would prefer a visualization that would expand and contract rather than fill up the screen up and down. Here is our feedback written out to be able to see it more clearly:
Martin:
- I told my wife about this project and she said that people could use this before getting a vaccine, or before therapy.
- Maybe have text that appears and disappears to prompt instructions (like breathe in, hold, breathe out...)
(Camilla Note: Will the text still be needed if we have detailed instructions written out in the program's dropdown (which we did not have yet?) Or maybe just have text appear at the startup of each exercise then it could go away eventually?)
Daniel/Heng:
- Would prefer to see circles that get bigger and smaller.
Dan:
- Would prefer to see a physical light fading in and out or a dim object vs. a computer screen.
(Camilla Note: I totally agree! Though we chose to work with P5 because overall it will be the least buggy for our needs. It also requires the least amount of *stuff* and is the most versatile, so we would be able to tweak it easily up until the last moment, and also afterwards. However it would be so great to get the visualization off the screen and project it really big in a room, huge, if possible. Otherwise this is something we will take into consideration but probably only after getting all the coding to work, loading the sounds into P5 and being able to trigger then properly, and building the enclosure, rather than spending that time hardwiring LEDs which we cannot change or adjust as easily...)
Meng Zhen:
- Maybe have the heartbeat visualization slow down with your heartrate (or at least slow down).
Lin:
- Would like to have a meditation timer or be able to pick the duration of the meditation. Need instructions for how to pick program change and then set it because it was not clear.
YeonHee:
- Maybe some visualization of heartbeat vs. speed of breath.
- Thinks wrist band would be good for sensor placement.
- Use images to explain breathing exercises so language is not necessarily needed.
(Camilla Note: My first thought here was to have an animation of someone breathing in then breathing out, or some visual directions like that. Will have to think about this and what we can achieve in P5- maybe that can be some kind of intro animation if we can get around to thinking about and creating that?)
Hefi:
- Would like to see something that expands and contracts.
- Maybe background music as well as the heartbeat sound? Would like if we choose it, and not to have an option on the user end for the background music.
- Colors that come to mind for enclosure: Green, brown, wood, natural colors.
(Camilla Note: I also brought up the idea of white, and he thought maybe this could work. I like the idea of incorporating natural wood as well, and maybe green buttons if I can find some that would work well?)
Shreiya:
- Maybe create some goal or arc or game in order to help relax and know when to "stop". Helps to relax if you know how long it will be.
WEEK 2 (for Nov 15th)
Update your system diagram and bill of materials based on what you learn from your playtest. By next week, you should know what devices or components you need, and should have ordered or obtained them.
- Update Arduino code to work with sensor data (using MIDI Meditation prototype)
- Write up feedback we got last week, blog change
WEEK 3 (for Nov 29th):
Update your blog with your detailed system diagram, BOM, and interaction plan.
- Sampling sounds, get those working in P5
- Collect data using the NEW sensor (may work a little differently)
WEEK 4 (for Dec 6th):
User-testable version of the project!
- Build enclosure(s) - prototype and final design, sew sensors into wristbands(s).
- Finalize the gui (something with a dropdown, nicer HTML)
WEEK 5 (for Dec 13th):
Finish your final project
Make sure your online documentation of the project is done as well
Prepare and rehearse how you want to present your project
- Documentation
- Final testing (lots of user testing)
FINAL PRESENTATION: December 13th
WINTER SHOW: December 17th-18th
Updates
11/14:
- We got the communication working to send messages for each command from the Arduino to the P5 sketch.
- Our next step is making sound samples and triggering them in P5, and playing with the P5 interface.
- For this next week: Think about enclosure. It will be pretty similar to the original design but with nicer more permanent materials (probably wood on the side panels with a white acrylic surface and small black buttons--which need to be higher this time to be above the acrylic surface). My next assignment for Intro to Fabrication is to make an enclosure so I plan to make the two enclosures for this combined with that assignment.