Fabrication

Day 99 @ ITP: Fabrication

I'm honestly getting to this late, because the last week I was mostly consumed by my final for Physical Computing and ICM and working on that project right up until the deadline (which did involve some more fabricating and expanding on things I did earlier in Fabrication class, but not for this project). I was suggested by two people to play with something to do with light - which is something I have done in a live projection setting but have been meaning to play with in terms of building some things at ITP. However I think whatever happens today will have to be pared back a lot (!). A friend suggested making a Dream Machine, and I think with one of the things I have I will be able to make some kind of miniature version of it using a small servo motor.

Screen Shot 2017-12-13 at 6.06.07 PM.png

Update 12/14:

The "dream machine" cutout was too heavy for the platform and motor I was able to get working (a DC motor, in the end.) So I created a prototype of something else inspired by it--the "lightning machine" -- which may look better through video than in person, but possibly could be fun in a large darkened room with a flashlight. Will try that out today in class and see how that works.

Materials: 
DC motor
2 AA batteries
Solder
Hot glue
Piece of wood board
Gaffer's tape
Piece of mylar emergency blanket (gold and silver)

25435525_10100456732885474_881422196_o.jpg
In progress 

In progress 

Update 12/16:

My friend ended up actually being inspired to use this contraption in a recording for an abstract dance piece. What I thought was a haphazard compromise ended up being a pretty cool musical instrument. It also actually looks beautiful and like an optical illusion sometimes when it spins without flopping on itself (unlike in the video below, where it is flopping, and I am also shining a flashlight on it while crouched in my closet). It is strangely relaxing to watch/listen to. Maybe I will document it more later as I never got a final photo or good video. I liked what my classmate said about how it reminded her of ASMR videos on YouTube. It's cool when things surprise you like that. In the future I would like to try making some motorized light and/or sound sculptures sculptures building off of ideas that came from this.

Day 96 @ ITP: Phys Comp

Yesterday I came to ITP and laser cut two more enclosures at a larger size (and failed to take photos of the process, but will take more later of the finished project). I made two because the wood was curved and I wasn't sure if they all would fit. It turned out that was true -- Ben Light was right, these boxes are tricky! However it still seemed like the best option for me at the moment to make sure it would stay together. 

In the afternoon Jim and I met up to make some new breathing visualizations. We added a "breathing rectangle" that grows up and down the screen, and a polygon that unfolds open with your breath cycle. We also beautified the "gui" or computer program pages he had started in P5. He also showed me how to "beautify" my code! Which is also helpful to find mistakes or places where you forgot a bracket or where it is broken.

Today we met again and wired up the new enclosure. Everything fit, however I think the enclosure could still be improved upon, maybe if I use flatter wood and also take my time more with glueing, as it was a bit of an ordeal trying to glue it last night, partially bc my plan was not thought out and I assumed it would be simpler than it turned out to be. I got some glue marks all over it which I think I could avoid in the future by removing excess glue with a dry cloth. 

It was helpful to wire up the new enclosure because it reminded us of how we organized the wiring on the Arduino/Breadboard, and also made it clearer how we would repeat it in the future if needed, and what we would change. 

We also attempted adding a heart LED onto the wristband which would also blink with the user's heartbeat, but for some reason that is not working yet, maybe because the LED is broken? We will troubleshoot later. 

25435453_10100456733384474_1174901435_o.jpg

Next up we will:

- Meet with Tom tomorrow afternoon for feedback before we continue.
- Troubleshoot the heart LED on wristband
- Update the heartbeat detection algorithm with Jim's reworked code to read the heart rate intelligently guess where missing heartbeats would go, to make the sound more consistent.
- Possibly add an option to view the heart rate.
- Have the dropdown menu show up when viewing the visualizations.
- Finish coding the "challenge" vs "duration" options and how those will work.
- Record audio guide

Day 89 @ ITP: Fabrication

For our next assignment with the two different materials I am thinking of making a chessboard with two different kinds of wood. I would cut the wood into strips. Maybe 12" x 12" is good.  Then I would glue the pieces together and then cut and glue again to make a checkerboard...also maybe I would order chess pieces for it and not make those! Or make rubber stamps like these... 

-

12/5:

I would still like to maybe make the chess board later, or chess pieces for a marble board I have which has broken pieces. Instead this week partially due to lack of time/finals I ended up going with the stamp idea. I have always wanted to make a stamp of the Perfect Wave logo. At first I was going to carve it but realized I could engrave an inverted image onto rubber with the laser cutter. I think I could have rastered the raised part maybe one more time but I haven't tried it yet, so maybe it will work? I also cut 4 squares out of the 1/8" Alder wood I used for last week's project to glue together for the handle and rasterized the logo onto one of the pieces for the top of the "handle". This time I also used the 75 W Laser cutter, which did seem more powerful, you just have to manually focus each time.

Next I will glue the wooden pieces and the rubber to the wood. 


Update 12/7: 

I tried the stamp as it looked above and some of the flat parts around the image were still stamping, maybe because it wasn't cut deeply enough around it the image, so I decided to carve it a little more by hand. I also realized I should have flipped the image, as it is coming out backwards from how it normally is, but it's also OK in this case as I will still use it/sometimes I have flipped the logo around depending on the occasion to play with it...but I may redo it properly with a few more passes and less space around it so I don't waste as much laser cutting on just cutting a rectangle around the shape, and then cut off the excess with scissors. But now it makes a pretty decent stamp.

The final stamp and print it makes

The final stamp and print it makes

The rubber came from the Dick Blick art supplies store on Bond St. around the corner from NYU -- "soft rubber" for printing, where they are having a holiday sale. I also got carving tools and special adhesive from Amazon so now I will need to make more stamps either with the laser cutter or by hand to use it which will be fun...

Day 79 - 85 @ ITP: Phys Comp and Fabrication

Here is prototype design #1 for the enclosure, made in Illustrator...these measurements are not exact (I also made the back wall slightly lower, because our idea was to have the top plexiglas slide in and out of the enclosure...) I also made the sides slightly larger to accommodate walls inside which will support the plexiglas top so this box is around 2.5" high, 5.5" wide and 8.5" long. I'm also not sure if the rounded corners will work practically. Maybe some other technique would need to be used or learned to get those or at least thicker wood to begin with and then sanding. And we may need some other way to support it from the inside if there are no screws. But this is the general idea for the enclosure for our P Comp final (which I am combining with the next Fabrication class assignment, which is to make an enclosure...if I don't have all the materials in time I will make a cardboard version at least):

Screen Shot 2017-11-23 at 11.33.29 PM.png

And a second version incorporating Jim's feedback, this version has mostly right angle corners (except for the top plate) and a longer bottom plate to accommodate the longer irregular design we came up with (I had forgotten to make the bottom panel longer before, then fixed and edited it in again below) and added a slot in the back panel for the top plate...I'm still waiting on materials due to the shipping backup so I will be doing a cardboard mockup first then hopefully a first version of the actual enclosure this week.

Screen Shot 2017-11-24 at 3.04.25 PM.png

Update 11/24:

24093912_10100448303917194_1843448107_o (2).jpg

I printed out a tiny paper mockup of the design and found that it is not quite right. I will need to adjust the front panel and also the length of the sides. Need to get the measurements exactly right (also of the buttons) before cutting into the wood...

Also waiting on these light up buttons for "note" + "instrument" (momentary) and "sustain" (on/off) buttons, this switch for power off, and these LEDs for the heart rate.

Light up buttons 16mm


Toggle button 13mm


Product Dimensions: 32.9mm x 13.1mm x 12.0mm / 1.3" x 0.5" x 0.5"

Product Weight: 5.0g / 0.2o

Heart LED

These arrived today! So will be able to measure.

These arrived today! So will be able to measure.


24133706_10100449274192754_1714926724_n.jpg

Update 11/27: 
We met on Sunday and rethought the design together. It seemed that having the protruding front panel was a little advanced to be sure that it would hold up with the buttons on it being pressed constantly, and my designs were not really that well thought out to ensure that it wouldn't break. Before we met I made the above sketch going back to the original design. I actually thought it might help to go back to the slotted design to reinforce the box which would also require keeping it square (sorry Ben, I know you hate them!!) because it seemed to work okay for the cube I made for the last Fabrication assignment, and because it would add some stability considering I didn't have a great backup plan for if it needed reinforcements, especially in the area with the buttons which will be continuously pressed and would need to be sturdily placed. I basically would like to make this very simple and durable for use after the final is over as well (and make two of them!) for us both to use and test out meditating with over the break and beyond hopefully, so it shouldn't break. So simplifying the design seemed like a better way to make sure that happens at least for this project's timeframe. I have been thinking in general about other manifestations this project could take, also with some input from friends and classmates, like making it a standalone hardware/light/sound creating piece of hardware (like a phone app but without the phone and would not be an app, but sort of light and sound driven meditation device or object) or also different instruments that could be created this way, but that would be for later on. In my time at ITP it would be fun to work on at least one musical instrument project or something that could have various iterations with a similar vocabulary or way of being built. But I digress.

Jim and I came up with a design that is very similar to the one above, but with the buttons placed on the longer panel. We will add a ridge inside and top frame for the plexiglas plate to slide in and out, thereby making it easier to open up and to fix anything with the electronics inside.

I will start laser cutting tonight (I mistakenly left it this late because I did not realize ITP would be closed over Thanksgiving week, but maybe it's for the best as some small design changes happened, and hopefully now it will be easier to complete without wasting a bunch of materials). 

I'm starting in general to think about ways that various similar things could be made with the same parts. The only more expensive part at this point seems to be the Arduino, but maybe some of them wouldn't need an Arduino Uno but some smaller microcontroller in order to work. I will leave a bookmark here to come back to that idea later.


Update 11/28:

I booked two hours on the laser cutter today and brought the design that Jim and I adjusted together on Sunday. The wood and buttons had arrived so I was able to measure the holes for the buttons and adjust them. I had some issues with the power settings on the laser cutter resetting a few times while printing, and also misremembering the speed once, so one or two pieces took longer to cut before I realized that this had happened. Otherwise following the settings in the document on the Desktop of the laser cutter's computer worked fine and I am getting the hang of how it works. Still want to experiment more with the wood shop, but this seems good for doing finer work like cutting openings for enclosures like this. Though it took a while to cut through 1/8" pieces, and I wondered if actually a 1/4" board would have been sturdier, and if maybe I should have used the 75W cutter to do it that way? Otherwise, the slots do fit (we flipped some pieces around to get the text in the right places), and it's a little too big for the Arduino + breadboard but also won't be sure of that until we add the inside supports for the top and all the wires, so at least it's definitely not too small. I think it would be nicer if it was more compact but that's just a visual side note and could be adjusted later for the next one.

Most importantly I already snapped off the ledge above where the top plate is supposed to go in/out, so that is a bad sign and will need to be fixed somehow or rethought design wise. I think one side snapped when I took out the piece in the slot which had been laser cut out, and the other side snapped when I was seeing if the acrylic would fit through (it did fit, but it seemed a lot heavier compared to the 1/8" Alder wood hence it breaking). Another solution would be to have a wooden top, which is definitely an option, especially if that seems more long lasting. I got this 1/8" Alder wood because it was recommended for laser cutting and also seemed thin enough to do a full box almost in a short amount of time on the cutter, but I think in the next iteration of this enclosure I will be taking into mind all the problems that came up with this first one. I also got some 1/8" Cherry wood and am wondering if that would be sturdier also. Again having more time on the laser cutter would have helped of course but everyone else is trying to finish things too for finals and a 2 hour chunk at a time seems reasonable as you are watching it and standing there the whole time... once I get a real plan I think I will reserve some hours at an off time, like 9am Saturday morning or something just to finish it properly and have extra time if something goes wrong. I think as I do more of these kinds of things I will gain a better vocabulary of tools for putting things like this together and using the right materials and steps in the process etc. On a positive note, the heart LED fits! We used the "boolean union" option in Illustrator to combine the shapes of the two sides I traced, and it actually fits perfectly now. Next we will sand down the 3 larger button holes as they are still slightly too small, but thankfully Jim has some tools that will help with this, and wiring the Arduino with the buttons and the LED and the heart sensor (which will be attached to the Arduino through that small hole under the heart shape), and programming the buttons...

24201482_10100449732329644_1899316904_o (1).jpg
24169386_10100449732065174_1399267256_o.jpg
24167502_10100449731860584_1732275174_o.jpg


<~~~~~~~~~~~~the broken piece 

Also need to decide for sure where the Arduino will be placed to adjust where the openings will be accordingly.....


Update 11/29:

A little late on this update, but I did glue the enclosure together last night, which was a bit messy. I met up with Jim yesterday afternoon and he helped to file the holes for the 3 larger buttons so that they would fit properly, using a needle file (pictured to right!) to sand them larger it in a circular motion. It worked, but it was too labor intensive and in the future I will definitely just make those openings a little wider and keep in mind that I should size up a little bit... maybe a couple of mm?. Also maybe I should get some of these for fixing irregularities so things fit etc (I was using scissors on a few pieces, which was not ideal). These are the readings I got when measuring the buttons with the caliper: 

24259713_10100450468374604_1826941410_o.jpg
24259732_10100450465495374_1944173544_o.jpg

I did measure around the part with the threads, but it was still too small. The buttons also fit with the cardboard prototype at this size but not with the wood, I'm assuming because the wood has no give. 

24321839_10100450461089204_1549115273_o.jpg
24259325_10100450461044294_104519727_o.jpg

The heart LED is staying in without any support at this point, which is nice! We will have to reinforce it with some glue somehow, which will close up the gaps. If it doesn't look right when lit up maybe we can also add the plastic behind as Ben suggested below, which could make it seem more solid I would imagine...

Other notes: I think the box could have been a bit smaller and less clunky feeling, also more solid feeling. And the top in acrylic doesn't look quite as integrated as I imagined so maybe design wise wood would be better for that as well. It would be great to try various iterations of enclosures that could be swapped out in different ways or used with different sounds and the same setup, in different sizes or something like this. Acrylic seems more durable but wood more fun to work with in general (except for maybe using acrylic to create see through parts/colors/having things light up/playing with colors or transparency ?) -- just need to find the most sturdy one to work with as this board snapped in a few places pretty easily after being cut, or maybe just going up to 1/4" or 3/8" (possibly from this link) would fix that. However I think I would need to upgrade to a higher powered laser cutter as it took 4-5 times to cut through 1/8" on the 50W laser cutter which ends up taking a lot of time.

Day 67 @ ITP: Intro to Fab

Assignment #3:
Make something with the laser cutter.

23516385_10100443423093404_759208477_o.jpg

Today I went into ITP to try out using the laser cutter for the first time ever. First I stopped by Canal Plastics and got a selection of acrylic to use hopefully for the full semester if not longer. I got large sheets of 1/8" transparent red, orange, yellow, green, light blue, and smaller sheets of gray smoke and 5 smaller sheets of opaque white for potential enclosure designs.

I originally reserved time on the 50 Watt cutter from 2-5:30pm, then ended up changing that earlier in the day to later from 5:30-9:00pm because I realized I hadn't left enough time for myself to prepare what I wanted to make and I ended up doing at home before coming in to Manhattan. I wasn't sure if I had messed up by changing my time on the day of, or how it works in the shop, so I went in not really knowing what to expect.

I got there at 5pm and took a moment to check over my files, and while I was doing that someone started using the 50 Watt machine. I told them a little before 5:30 came around that I had reserved time and they quickly finished what they were currently cutting but because of that I ended up starting closer to 6, which in itself wasn't a big deal. The person working in the shop was very nice about helping me set up my file for the first time, then I was able to do the rest and start printing/cutting jobs on my own... While I was on the machine a couple of people asked me when I would be done and obviously were very eager to use it right then, partially because the 60W cutter seemed to not be working properly. I thought that my project was going more quickly than I anticipated so I told them I would be done relatively soon, but I also felt some pressure to rush because they wanted to use it as well. I thought Saturday night would be a quiet time in there as nobody had reserved time on the calendar, but I found that nobody was checking the calendar anyway maybe? And if you do reserve time and two people are waiting for you to be done, what is the etiquette (especially if you still were planning to use it for at least an hour or two?) Do you just tell them when you will be done? How long is too long to reserve ahead of time? I learned some things I guess about how using the laser cutter is something that a lot of people are sometimes trying to use at once regardless of the calendar and am wondering how to handle that in the future. 

I also realized that I should have set up my file better beforehand, and set the vector lines to 0.001, and also taken the paper film off the acrylic before starting to cut, as it took up some time to do that. 

Anyway. For this first project, I decided to make a rainbow cube! I used this website to create a 4" cube with a top that would work with the 1/8" acrylic. I started with a test laser cut on cardboard then went on to cutting directly out of the sheets of acrylic, cutting out each side of the cube in a different color. I found that it took 4 runs of the laser cutter to cut all the way through the 1/8" acrylic following the settings in the chart on the cutter's computer desktop (note for future). I wonder if that means 1/4" thick acrylic would take 8 times to cut through?

I also got acrylic glue from Canal Plastic, and will glue these at home. I wanted to try making a baby block for my friend's new son, Leo, out of transparent yellow with a lion on one side and L, E, O on three of the other sides. I'm not sure if I will be able to do another session in the shop before class to do that before class...also wondered if the acrylic glue is baby safe? But I got to rasterize the letters "ITP" on some cardboard, though I didn't etch anything onto acrylic yet. I felt some pressure to get off the machine so other people could use it and wasn't sure if etching was necessary for this week's assignment. I now feel confident that I can do more projects with the laser cutter of different kinds though. Perhaps I will also try etching something onto the cutting boards from last week or individualize them for people. Just need to figure out the scheduling thing and how best to handle/bypass complications regarding that. 

First 5 pieces of my cube. I also got some acrylic glue at Canal Plastic and will glue these at home.

First 5 pieces of my cube. I also got some acrylic glue at Canal Plastic and will glue these at home.

All six sides of the cube (one will be the "top" of the box...)&nbsp;

All six sides of the cube (one will be the "top" of the box...) 

Final cube - pre-glueing, but held in place: Cat for scale.

Final cube - pre-glueing, but held in place: Cat for scale.

Note: After glueing the first 5 pieces together, I realized I also could have laser cut some pieces or made a bent a piece and glued it on the top piece as a handle and also to indicate the top and how to open it. Because otherwise it is a little fiddly to open and close.

Day 60 @ ITP: Intro to Fab

Week 2
Make 5 of the same thing.

I'm thinking for our second assignment of making 5 cutting boards. First I found an example that maybe seemed too simple (a flag shape or just a piece of wood with a triangle on one end, with sanded corners), but also remembered that I have never made anything in a wood shop before. Then I found this tutorial: 

Source:&nbsp;diy project: homemade cutting boardsMaterials- untreated&nbsp;hardwood plank (these are made with Norfolk pine) (it is important to get untreated wood since you are using these for food prep)- jigsaw- orbital sander- paper- scissors- pe…

Source: diy project: homemade cutting boards

Materials

- untreated hardwood plank (these are made with Norfolk pine) (it is important to get untreated wood since you are using these for food prep)

- jigsaw

- orbital sander

- paper

- scissors

- pencil

- mineral oil + rags

Here is another reference for cutting curves with a bandsaw.

This project felt like a a good balance of not too hard but also a little more challenging in its design, and I also like the way these look. It's more of a cheese board. Maybe I can use these as gifts if it goes well, too. My first thought was to make 5 boxes that could potentially be used as enclosures for future projects, but when looking at tutorials I decided that was too complicated for the time I have to finish these in, and also maybe too ambitious for a first project in the shop.

I will update again after I go to Home Depot to get the wood, and after I attempt to cut out the first board in the shop...

Update on 11/6: 

I was unable to find untreated wood on Saturday, so I didn't end up coming into ITP.  I drove to Home Depot and had no luck there, then went to a place that said it was a lumber yard in Bushwick but it turned out to be hardware store and they only sold pine which they said had chemicals in it. But I did get some pine just to do a test project on or in case I needed it and some other things (sandpaper, dust masks).

Then I came into ITP and tried to start a different project, sliding bookends, in the shop on Sunday night. However the bandsaw had just broken and I was counting on using it. I realized I could probably use the other main saw that I used to cut the boards into pieces, carefully chipping away at it to make a slot for the bookends (which are supposed to fit on a bookshelf and slide back and forth). But first I tried the smaller meter(?) saw and made some really funky cuts and ended up having to put my first attempts in the scrap bin. 

I realized that it's difficult to count on using certain tools and that it is important for assignments at least to start as soon as possible and also to be flexible in terms of what I am making.

In the end I decided to back to trying to make the cutting boards. 

My friend asked someone she knew who knew about places to find untreated wood, and as it turns out he sent a super helpful list of places in the city to check out (a couple of these are already on the Intro to Fab list of resources, but the other two were not):

Prince Lumber
618 W 47th St, New York, NY 10036
(212) 777-1150

LeNoble Lumber Co., Inc.
38-20 Review Ave, Long Island City, NY 11101
(212) 246-0150

Rosenzweig Lumber Corporation
801 E 135th St #1, Bronx, NY 10454
(718) 585-8050

Dykes Lumber
43-01 9th St, Long Island City, NY 11101
(718) 784-3920

I ended going to LeNoble Lumber Co. in LIC this morning, and it is an incredible warehouse full of every kind of wood you could think of. I got some Maple (most recommended for cutting boards), Red Oak, Sepale, and another kind I forget the name of which I will add to this post later [*Cherry], in a few different thicknesses, thinking ahead about making enclosures later this semester and also just about how difficult it was just to get the wood this time around and how it would be nice to have reserves...

Since the bandsaw may still be broken I might try to simplify the design to some square cutting boards which I will sand down.. Not sure without this if this satisfies the requirement of a multi step process -- I would cut it on the saw and then use the belt sander, and if the belt saw is working I would also use it to create rounded corners ideally, then also oil it them with a food safe mineral oil.

I did use the meter saw on a project that I abandoned, and haven't found a reason to use the drill press for this yet...Also thought about making bookends in a more traditional way that screw together using dowels, so if the cutting boards don't work I will do that instead. I was just excited about making the cutting boards because I could use them as gifts, and I would also prefer to have one of those than the book ends! But am trying to think of a way I can add more steps to the cutting board, such as adding a juice trough, or a hole somewhere, especially if I am able to shape a handle onto it.

I'm now thinking of mostly following this tutorial... and finding a way to customize it somehow.

Update on 11/7:  

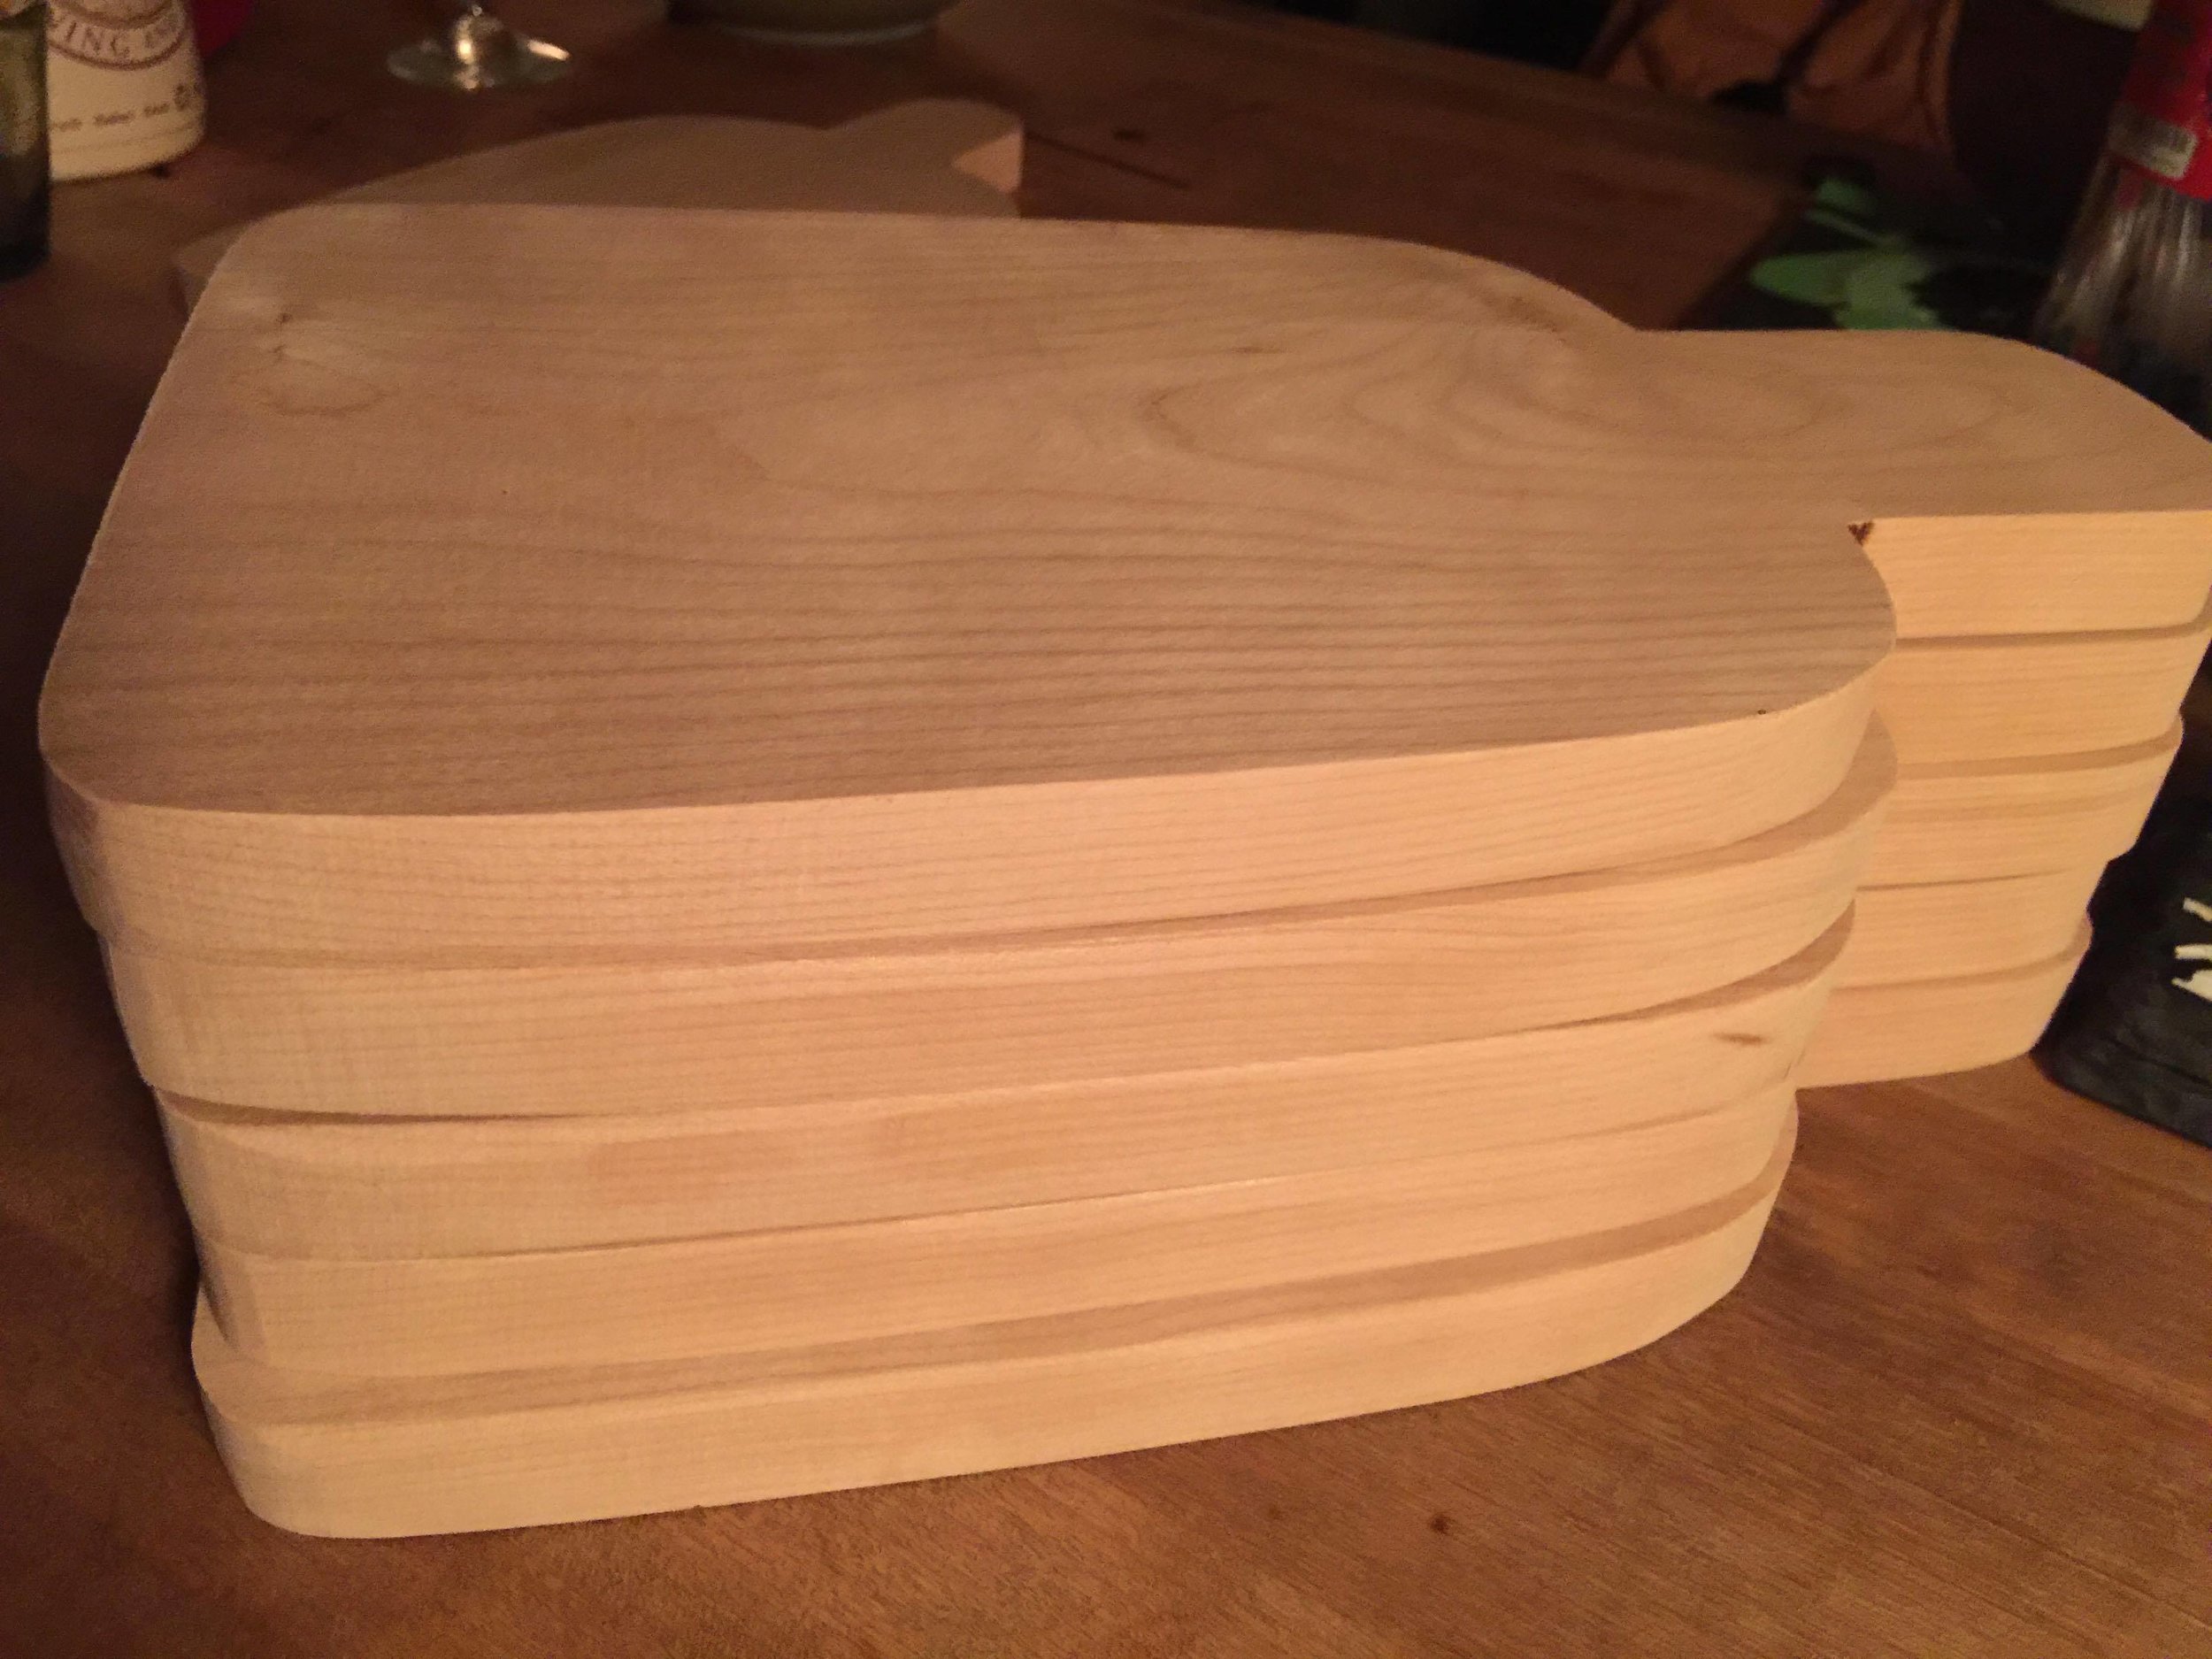
I ended up making the cutting boards (which I am now calling cheese boards, because they are small!) Instead of using the band saw, which had been fixed, I discovered with some help from someone in the shop that I could use the left side of the more intense part of the belt sander (what is that called?) to chip or eat away at the wood, molding it into the cheese board shape after I cut it into 12" x 8" rectangles using the saw. I drew an outline in pencil on the boards and then started to sand away at them, pushing them in at a side hard angle to cut out the handles, which produced a lot of dust but not as much as I expected. I ended up using the Cherry wood (the one I forgot before) because I liked its grain and it seemed very high quality, and it was also recommended as one of the boards suitable for a cutting board, specifically I found a few cheese boards made with cherry wood. It felt like very fine wood and was easy to sculpt with the sander. 

I spent around 2-3 hours in the shop to get them to this point, planning them out and using the saw and the sander: 

23414619_10100441925484624_1127716078_n.jpg

And another hour or so refining them and making the handles smaller (I still think the handles could be a little thinner or more tapered, and maybe the boards a little larger ): 


I sanded them down a bit more at home on the edges to remove rough parts that the belt sander couldn't get, and to smooth down the sides a little more.

I also tried sanding the surface of one of them just to get off any extra dust or anything like that, but decided that was a mistake. Thankfully I think I only scratched the surface of one of them.

After sanding them I decided they were as done as they are going to be before Thursday to allow me enough time to apply mineral oil and let it soak in, which felt like the final step, so I went ahead and added the first layer of oil (Boo's Block Mystery Oil): 

23423798_10100441877575634_141474243_o.jpg

I also forgot to mention I made a sixth one as an experiment with a thinner handle and generally a little smaller than the others.
 

I left the board oil on all day, then applied the bottom side coat at night after wiping off the excess oil to stay on overnight. Then I also will apply board cream, if there is time before Thursday, but definitely before using them or giving them as gifts. Overall I feel pretty happy with them! I was thinking I could also have drilled a hole in the handles for hanging them, but I was worried about messing them up after spending so much time sanding them and also ran out of time. I also could have made the handle thinner in the middle like the first boards I was looking at, and/or added an inscription or image on the handle like a piece of cheese. But I also think they are simple and something of their own as they are. 

Day 54 @ ITP: Intro to Fab

Week 1, Assignment #1:
Make a flashlight.

Some flashlight inspiration
1) Video: 


MY PROCESS

I researched three different ways of making a flashlight (links and video above). I initially wanted to follow the one with a clear tube that shows the electronics and solder my own battery pack to an LED. Then I looked at one that used an older fashioned 3V bulb and two D batteries. But after realizing how I would have to acquire or buy some parts to do either of these, I ended up going for some hybrid of the three, to create one that wouldn't require buying anything I didn't already have and could be made by recycling things I had in my closet or around my house (of which there are plenty, though I have kept some stuff around to potentially use or recycle). I took apart an old cheap plastic flashlight and inspected how it worked. This one worked very similarly to the project with the two D batteries and the 3V bulb. It used a copper attachment to create the switch that connected the batteries for the light to turn on. I also took apart an old bike light meant to go on the front of a bike's handlebars like a mounted flashlight, which I had not been using, and took out the battery compartment attached to the LEDs, which worked similarly to the one required for the tutorial with the clear tube. I decided to use this as my light instead as it was basically garbage to me as it was, and the LEDs were already wired to the battery pack and working, so I could use it for this project.

I used a paper towel tube to create the handle of the flashlight, cutting it down a bit and retaping it together with electrical tape. I wrapped the cardboard tube around the battery pack so that it would be held in place, further securing it by taping it down with electrical tape, and cut a hole in the tube to access to the pushbutton on on the battery pack. Voila! A flashlight. Unfortunately I didn't take any photos at this point of the process, but it was just a paper towel tube cut down to a smaller size and sealed with electrical tape, and the battery pack + LED inside, with a hole for the switch. It was a very rudimentary flashlight. I experimented with putting different filters on the top of it to filter the light, and using mylar as a reflector, and with various parts as tube caps. 

23023136_10100438149556614_956800435_o.jpg

Then I found the YouTube video on making a flashlight using plastic bottles. I remembered I had a green plastic Ginger Ale bottle, then rinsed it out and cut it up to add a green attachment to the top of my flashlight. I stuck the bottle side of the bottle with the cut off part into the top to create a shield for the light. I also used the plastic bottle cap as an end cap, which incidentally fit the tube perfectly. Now it seemed a bit more like a legitimate "design", and I didn't mind the color combinations either, or how the light reflected through the green plastic to cast a greenish glow. I'm still not sure if I will add an additional lens or filter, as the LEDs themselves are almost blindingly bright. However I do think I will use this flashlight, which is a plus!


SOME NOTES

I realize I should probably manually wire my own LEDs to a battery pack for this project. Before Thursday if I can find time, maybe on Wednesday afternoon, I would like to make another similar style of flashlight but through soldering a battery pack to an LED myself, or if not definitely for a future project. But though it is not super hand made, for this first attempt it seemed efficient to recycle this battery pack from the bike light, as I was focusing more on how I wanted to put it together with what I had rather than on assembling the electronics from scratch. And the research for making this flashlight did help however to understand more how different portable flashlights work and how I could make it work. So I think my conclusion after getting this far is that I will make another one but with my own wiring, using this one as a model for it...the only major design flaw I see with this version it is that it is not easy to disassemble and requires taking off some electrical tape and re-taping it afterwards to put it back together, though it can be done. Also, maybe next time I will use rechargeable batteries.