
Update on final project:
I would like to make three audio-visual sandboxes using these images as canvases, which are photos of 35mm prints I found at my parents' from Chile when we lived there circa 1995 or 1996...the last one is of our backyard in Vitacura. I just really like the colors and would like to see how they would look slit scanned in the backgrounds of these sandboxes. I also feel that for what I am imagining just one image repeating will be enough for these, except maybe would like to change exactly how it scans each time even if the source images do not change.


Day 68 @ ITP: Phys Comp
Timeline for working on our Final Project (Camilla and Jim)
WEEK 1: Prepare for playtesting.
Our diagram about how the new version (P5 Meditation - working title) will work! Before playtesting. (Click to enlarge)
Last Tuesday night before the playtesting we sat down and created a diagram of how we wanted our new version of the MIDI Meditation (working title: "P5 Meditation") would work. We ended up deciding to use P5 to store and trigger the sounds instead of using MIDI and software because we were having issues with using MIDI commands that would work cross platform for both OSX and Windows, and also this way the whole system would be more streamlined and also require less expensive software to use (and it will also be more modular and changeable based on what we end up wanting to do with the visualizations).
This way we can also just code the Arduino once to take in and send data to the sketch and make adjustments on the P5 end (and get better at using P5 and serial communication!) We decided that the user would have a choice of a few breathing exercises from a drop-down menu, and that we would use our feedback from the playtesting to figure out how that should work.
This way we can also just code the Arduino once to take in and send data to the sketch and make adjustments on the P5 end (and get better at using P5 and serial communication!) We decided that the user would have a choice of a few breathing exercises from a drop-down menu, and that we would use our feedback from the playtesting to figure out how that should work.
Our notes from playtesting... (Click to enlarge)
Our notes from playtesting part two... (Click to enlarge)
Using Processing to begin with we created a simple visualization of the breath that looked like a wave or water that filled up the screen and then subsided based on when you breathe in, hold your breath, or breathe out. People seemed to not respond to this so much. In fact we had a few people all have the same reaction, which is that they would prefer a visualization that would expand and contract rather than fill up the screen up and down. Here is our feedback written out to be able to see it more clearly:
Martin:
- I told my wife about this project and she said that people could use this before getting a vaccine, or before therapy.
- Maybe have text that appears and disappears to prompt instructions (like breathe in, hold, breathe out...)
(Camilla Note: Will the text still be needed if we have detailed instructions written out in the program's dropdown (which we did not have yet?) Or maybe just have text appear at the startup of each exercise then it could go away eventually?)
Daniel/Heng:
- Would prefer to see circles that get bigger and smaller.
Dan:
- Would prefer to see a physical light fading in and out or a dim object vs. a computer screen.
(Camilla Note: I totally agree! Though we chose to work with P5 because overall it will be the least buggy for our needs. It also requires the least amount of *stuff* and is the most versatile, so we would be able to tweak it easily up until the last moment, and also afterwards. However it would be so great to get the visualization off the screen and project it really big in a room, huge, if possible. Otherwise this is something we will take into consideration but probably only after getting all the coding to work, loading the sounds into P5 and being able to trigger then properly, and building the enclosure, rather than spending that time hardwiring LEDs which we cannot change or adjust as easily...)
Meng Zhen:
- Maybe have the heartbeat visualization slow down with your heartrate (or at least slow down).
Lin:
- Would like to have a meditation timer or be able to pick the duration of the meditation. Need instructions for how to pick program change and then set it because it was not clear.
YeonHee:
- Maybe some visualization of heartbeat vs. speed of breath.
- Thinks wrist band would be good for sensor placement.
- Use images to explain breathing exercises so language is not necessarily needed.
(Camilla Note: My first thought here was to have an animation of someone breathing in then breathing out, or some visual directions like that. Will have to think about this and what we can achieve in P5- maybe that can be some kind of intro animation if we can get around to thinking about and creating that?)
Hefi:
- Would like to see something that expands and contracts.
- Maybe background music as well as the heartbeat sound? Would like if we choose it, and not to have an option on the user end for the background music.
- Colors that come to mind for enclosure: Green, brown, wood, natural colors.
(Camilla Note: I also brought up the idea of white, and he thought maybe this could work. I like the idea of incorporating natural wood as well, and maybe green buttons if I can find some that would work well?)
Shreiya:
- Maybe create some goal or arc or game in order to help relax and know when to "stop". Helps to relax if you know how long it will be.
WEEK 2 (for Nov 15th)
Update your system diagram and bill of materials based on what you learn from your playtest. By next week, you should know what devices or components you need, and should have ordered or obtained them.
- Update Arduino code to work with sensor data (using MIDI Meditation prototype)
- Write up feedback we got last week, blog change
WEEK 3 (for Nov 29th):
Update your blog with your detailed system diagram, BOM, and interaction plan.
- Sampling sounds, get those working in P5
- Collect data using the NEW sensor (may work a little differently)
WEEK 4 (for Dec 6th):
User-testable version of the project!
- Build enclosure(s) - prototype and final design, sew sensors into wristbands(s).
- Finalize the gui (something with a dropdown, nicer HTML)
WEEK 5 (for Dec 13th):
Finish your final project
Make sure your online documentation of the project is done as well
Prepare and rehearse how you want to present your project
- Documentation
- Final testing (lots of user testing)
FINAL PRESENTATION: December 13th
WINTER SHOW: December 17th-18th
Updates
11/14:
- We got the communication working to send messages for each command from the Arduino to the P5 sketch.
- Our next step is making sound samples and triggering them in P5, and playing with the P5 interface.
- For this next week: Think about enclosure. It will be pretty similar to the original design but with nicer more permanent materials (probably wood on the side panels with a white acrylic surface and small black buttons--which need to be higher this time to be above the acrylic surface). My next assignment for Intro to Fabrication is to make an enclosure so I plan to make the two enclosures for this combined with that assignment.
Day 67 @ ITP: Intro to Fab
Assignment #3:
Make something with the laser cutter.

Today I went into ITP to try out using the laser cutter for the first time ever. First I stopped by Canal Plastics and got a selection of acrylic to use hopefully for the full semester if not longer. I got large sheets of 1/8" transparent red, orange, yellow, green, light blue, and smaller sheets of gray smoke and 5 smaller sheets of opaque white for potential enclosure designs.
I originally reserved time on the 50 Watt cutter from 2-5:30pm, then ended up changing that earlier in the day to later from 5:30-9:00pm because I realized I hadn't left enough time for myself to prepare what I wanted to make and I ended up doing at home before coming in to Manhattan. I wasn't sure if I had messed up by changing my time on the day of, or how it works in the shop, so I went in not really knowing what to expect.
I got there at 5pm and took a moment to check over my files, and while I was doing that someone started using the 50 Watt machine. I told them a little before 5:30 came around that I had reserved time and they quickly finished what they were currently cutting but because of that I ended up starting closer to 6, which in itself wasn't a big deal. The person working in the shop was very nice about helping me set up my file for the first time, then I was able to do the rest and start printing/cutting jobs on my own... While I was on the machine a couple of people asked me when I would be done and obviously were very eager to use it right then, partially because the 60W cutter seemed to not be working properly. I thought that my project was going more quickly than I anticipated so I told them I would be done relatively soon, but I also felt some pressure to rush because they wanted to use it as well. I thought Saturday night would be a quiet time in there as nobody had reserved time on the calendar, but I found that nobody was checking the calendar anyway maybe? And if you do reserve time and two people are waiting for you to be done, what is the etiquette (especially if you still were planning to use it for at least an hour or two?) Do you just tell them when you will be done? How long is too long to reserve ahead of time? I learned some things I guess about how using the laser cutter is something that a lot of people are sometimes trying to use at once regardless of the calendar and am wondering how to handle that in the future.
I also realized that I should have set up my file better beforehand, and set the vector lines to 0.001, and also taken the paper film off the acrylic before starting to cut, as it took up some time to do that.
Anyway. For this first project, I decided to make a rainbow cube! I used this website to create a 4" cube with a top that would work with the 1/8" acrylic. I started with a test laser cut on cardboard then went on to cutting directly out of the sheets of acrylic, cutting out each side of the cube in a different color. I found that it took 4 runs of the laser cutter to cut all the way through the 1/8" acrylic following the settings in the chart on the cutter's computer desktop (note for future). I wonder if that means 1/4" thick acrylic would take 8 times to cut through?
I also got acrylic glue from Canal Plastic, and will glue these at home. I wanted to try making a baby block for my friend's new son, Leo, out of transparent yellow with a lion on one side and L, E, O on three of the other sides. I'm not sure if I will be able to do another session in the shop before class to do that before class...also wondered if the acrylic glue is baby safe? But I got to rasterize the letters "ITP" on some cardboard, though I didn't etch anything onto acrylic yet. I felt some pressure to get off the machine so other people could use it and wasn't sure if etching was necessary for this week's assignment. I now feel confident that I can do more projects with the laser cutter of different kinds though. Perhaps I will also try etching something onto the cutting boards from last week or individualize them for people. Just need to figure out the scheduling thing and how best to handle/bypass complications regarding that.

First 5 pieces of my cube. I also got some acrylic glue at Canal Plastic and will glue these at home.

All six sides of the cube (one will be the "top" of the box...)

Final cube - pre-glueing, but held in place: Cat for scale.
Note: After glueing the first 5 pieces together, I realized I also could have laser cut some pieces or made a bent a piece and glued it on the top piece as a handle and also to indicate the top and how to open it. Because otherwise it is a little fiddly to open and close.
Day 65 @ ITP: Animation
Storyboard for After Effects Animation w/ Dom C.:
Keying out Dom's full-body green screen suit!

Reference:
Update on 11/11:
We will also be incorporating another character (possibly a skateboarding sloth) with limbs that will move around, following what we did in class this week. The green screening may or may not happen and we realized it wasn't really necessary for completing the assignment. However if we do get that footage we will incorporate it anyway. Either way something with a skateboarding character or two characters (either two animated characters, or one real/manipulated character and one animated) will most likely be part of this project...
Day 64 @ ITP: ICM
Final project proposal:
For my final ICM project I plan to make 3-5 audio-visual collages that can be manipulated by the viewer. I would like the viewer to be able to change them visually as well as sonically.
I am trying to keep my expectations for this within reason so I can code them pretty much myself with some help but my goal is to have mastery over the basic elements of code involved here for these so that I could replicate more of them and potentially add onto this idea later and develop it.
I'm imagining a canvas for each, which may be a video going through the slit scan effect from the last assignment, if it's possible to put images on top of a video in the background(?), and some elements in a scene, probably abstract ones, that can be clicked on then dragged around to sort of "collage" or arrange them. Meanwhile a background song or audio layer would be playing, and when the viewer clicks on each element, a new layer of audio would be introduced or taken away, or a one time audio sample would be triggered. I would also like to have one element in each sketch that would add some subtle audio effect to the sound when it is dragged in an x-y axis. This interaction may be pretty simple but hopefully fun tool for interacting with a piece of music.
I got some feedback in class to check out Bjork's ReacTable-- here it is, to watch later!

Reactable - How it works (High Quality) - Bjork http://www.VOLUMEN11.com - ONE LOUDER! Reactable is a collaborative electronic musical instrument with a tangible interface based on a table, and inspired by modular synthesizers of the sixties. It was developed by the Music Technology Group at the University Pompeu Fabra in Barcelona.
Note:
For my Phys Comp final I am working with my partner in class to create a visualization of breathing exercises in a sort of computer program which we plan to make using P5, to be used for meditation, along with a sonification of the user's heartbeat which is triggered from a pulse sensor using an Arduino. We will also be creating a sound library of samples using P5 which will be triggered by the heartbeat data coming from the Arduino. So I will be working in P5 for that as well, but some of the math is beyond my capabilities in the code. However I think I will learn a lot and it will be fun to brainstorm the types of interactions or interface we can code using P5 as an engine.
Update on 11/13:
I wanted to add my plan for completing this project. I went back and forth between thinking that I should just focus on the P Comp project and my role helping with P5 for that instead of doing a separate final for ICM, but I think that I could create at least 3 of these musical sandbox ideas for the final, and would feel good about doing that. It would also be more based on code that we learned in this class. This is how I plan to do it, and I am scaling back what I will do based on the fact that I will not have all that much time:
For Nov 15:
Gather images and sounds for compiling/working with for 3 different compositions. Keep them simple. Some loops and some individual sounds (maybe this can be in an array so I can switch which one gets triggered?) Choose whether there will be video in the background or just one slit scanned image in the background that repeats and maybe changes how it repeats upon refreshing (or not)...
For Nov 22:
No class.
Meet with Aarón for advice. Maybe focus on the interactions between the sounds based on where they all are on the canvas. Get an image slit screening in the background and place images on top to drag around and trigger sounds with (ambient loops, and one hits in an array).
For Nov 29:
Come up with a pleasing interaction between the sounds. Play with different images and sounds. Figure out what is not working if anything and make a plan to debug it.
For Dec 6:
Do any debugging. Meet with a resident for help debugging if there are any issues. Tweak the visuals and sounds as needed (think of cooking like salt and pepper at this point). Think about the interaction. Is this a way to showcase music or to make music? Do a blog post.
For Dec 13:
Prepare final presentation. Demonstrate how it works and have people in class play with it maybe as part of the presentation if they would like?
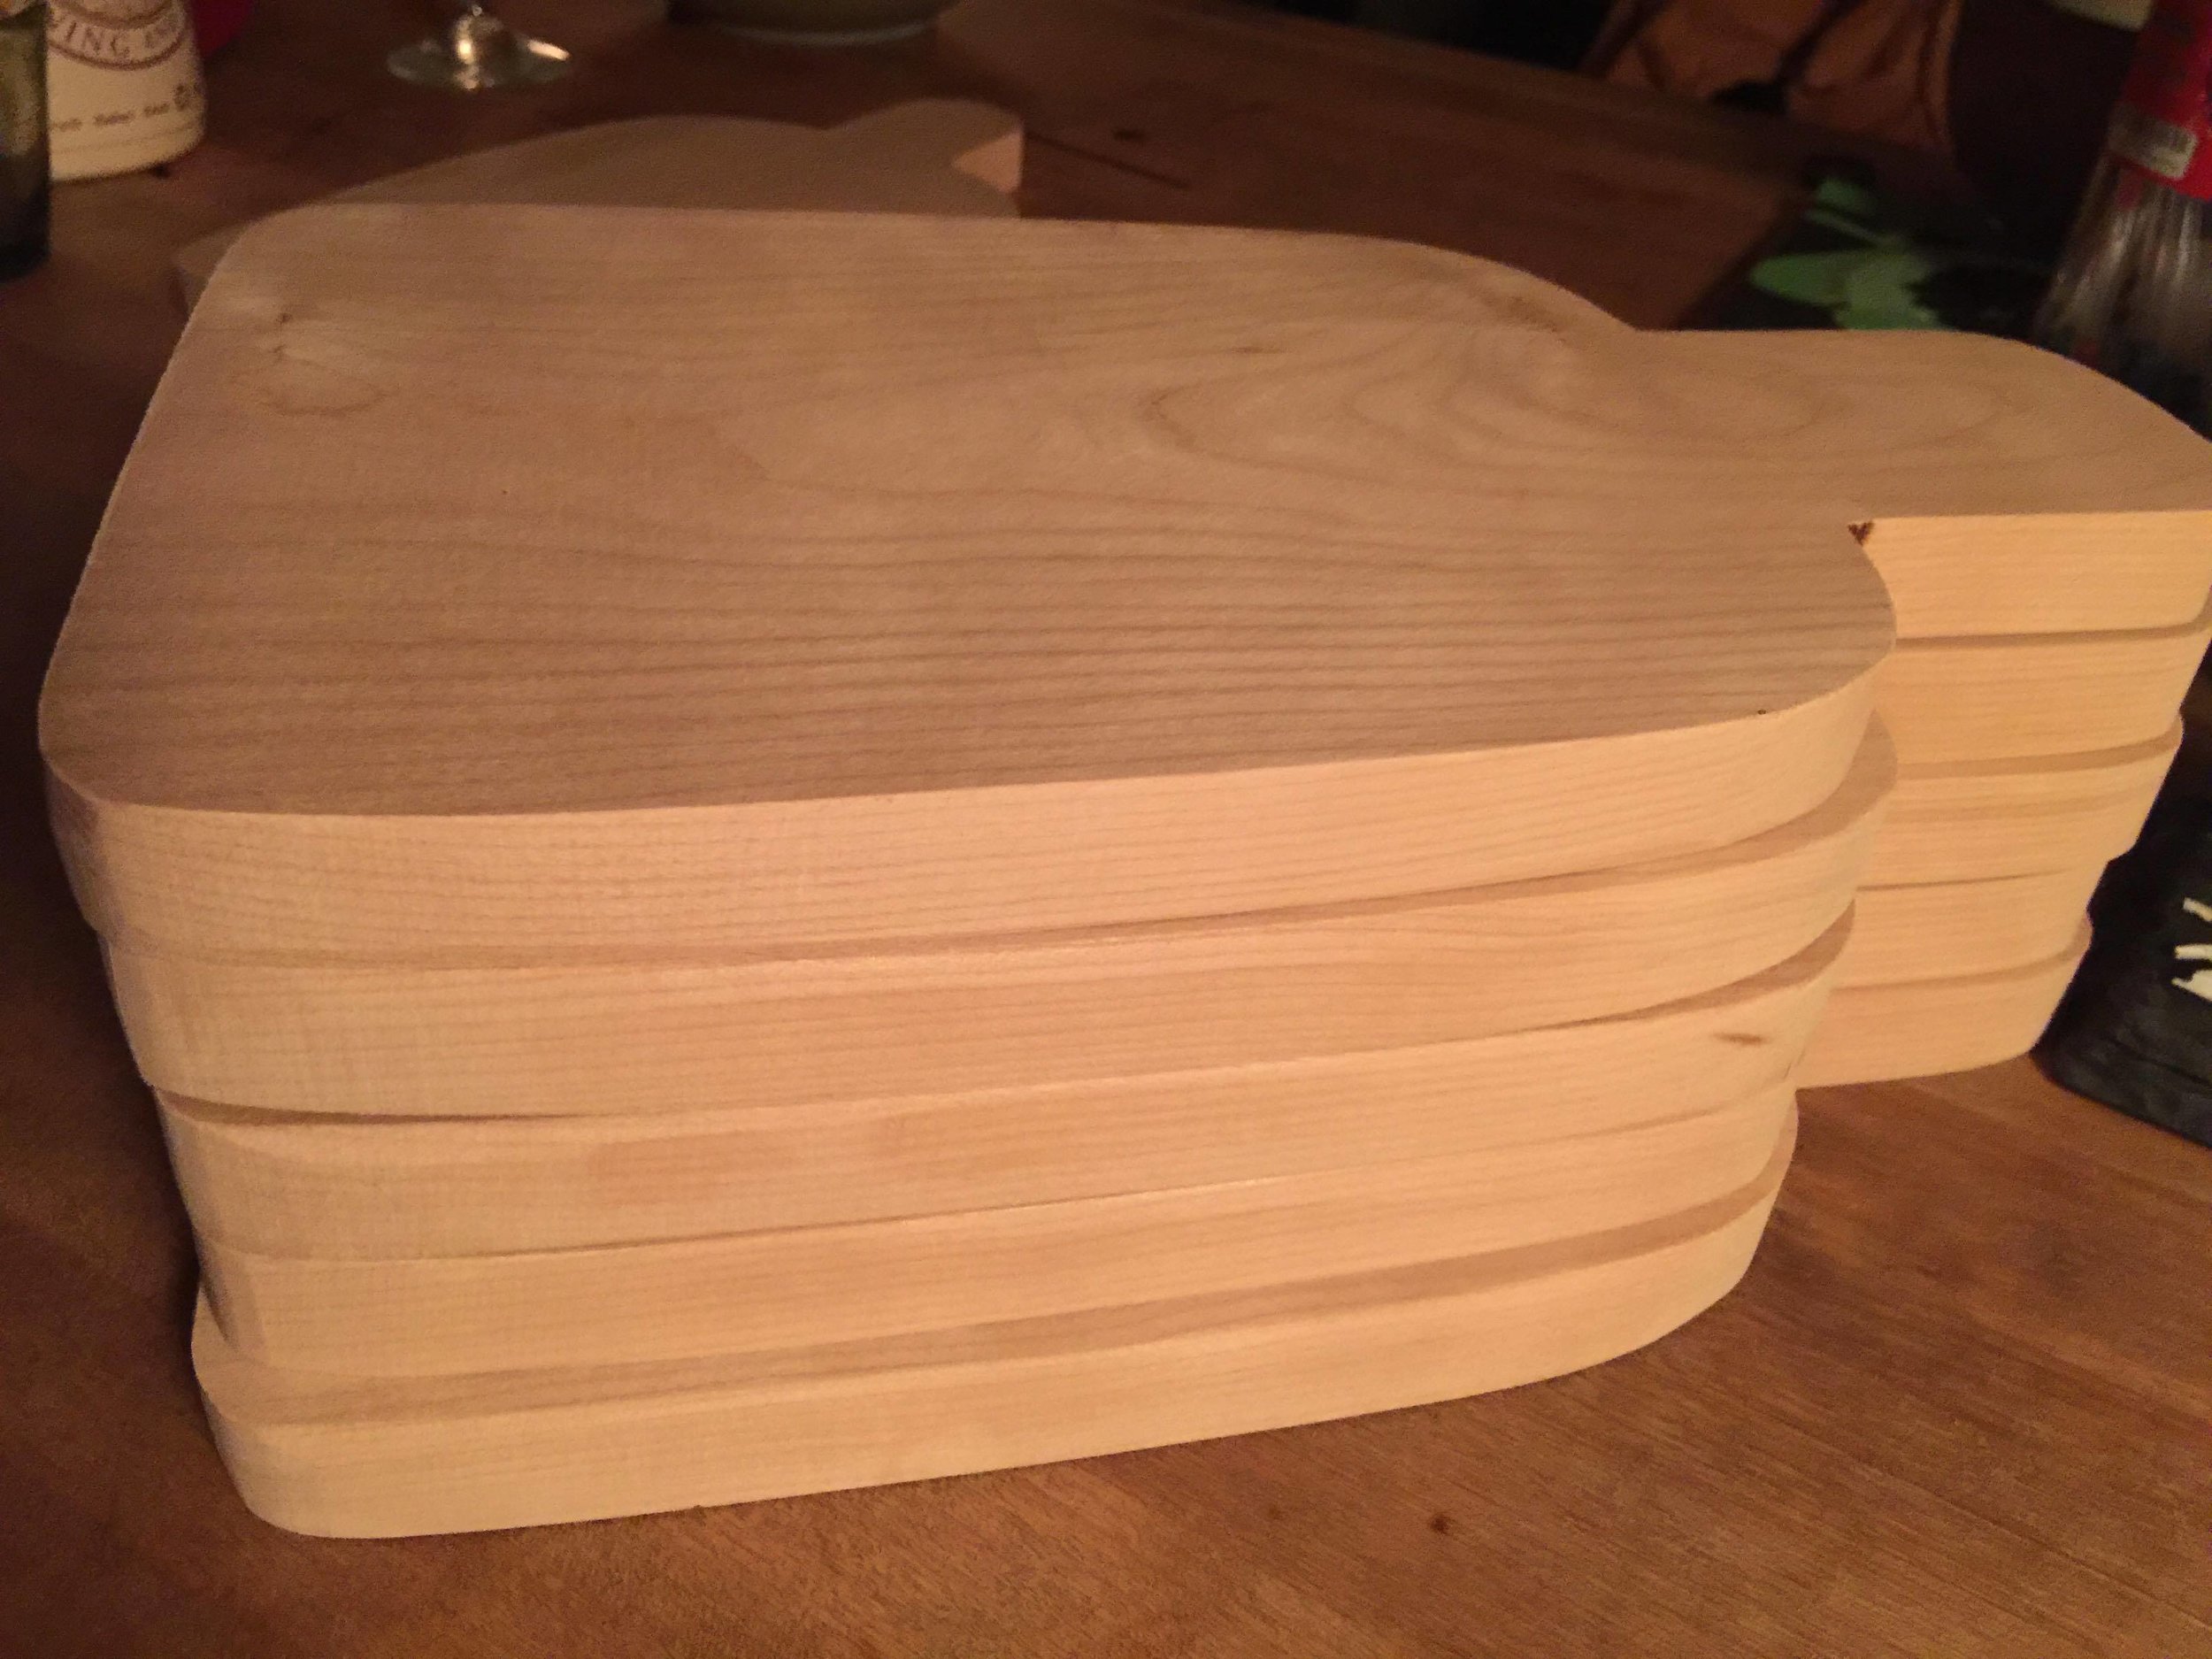
Day 60 @ ITP: Intro to Fab
Week 2
Make 5 of the same thing.
I'm thinking for our second assignment of making 5 cutting boards. First I found an example that maybe seemed too simple (a flag shape or just a piece of wood with a triangle on one end, with sanded corners), but also remembered that I have never made anything in a wood shop before. Then I found this tutorial:

Source: diy project: homemade cutting boards
Materials
- untreated hardwood plank (these are made with Norfolk pine) (it is important to get untreated wood since you are using these for food prep)
- jigsaw
- orbital sander
- paper
- scissors
- pencil
- mineral oil + rags
Here is another reference for cutting curves with a bandsaw.
This project felt like a a good balance of not too hard but also a little more challenging in its design, and I also like the way these look. It's more of a cheese board. Maybe I can use these as gifts if it goes well, too. My first thought was to make 5 boxes that could potentially be used as enclosures for future projects, but when looking at tutorials I decided that was too complicated for the time I have to finish these in, and also maybe too ambitious for a first project in the shop.
I will update again after I go to Home Depot to get the wood, and after I attempt to cut out the first board in the shop...
Update on 11/6:
I was unable to find untreated wood on Saturday, so I didn't end up coming into ITP. I drove to Home Depot and had no luck there, then went to a place that said it was a lumber yard in Bushwick but it turned out to be hardware store and they only sold pine which they said had chemicals in it. But I did get some pine just to do a test project on or in case I needed it and some other things (sandpaper, dust masks).
Then I came into ITP and tried to start a different project, sliding bookends, in the shop on Sunday night. However the bandsaw had just broken and I was counting on using it. I realized I could probably use the other main saw that I used to cut the boards into pieces, carefully chipping away at it to make a slot for the bookends (which are supposed to fit on a bookshelf and slide back and forth). But first I tried the smaller meter(?) saw and made some really funky cuts and ended up having to put my first attempts in the scrap bin.
I realized that it's difficult to count on using certain tools and that it is important for assignments at least to start as soon as possible and also to be flexible in terms of what I am making.
In the end I decided to back to trying to make the cutting boards.
My friend asked someone she knew who knew about places to find untreated wood, and as it turns out he sent a super helpful list of places in the city to check out (a couple of these are already on the Intro to Fab list of resources, but the other two were not):
Prince Lumber
618 W 47th St, New York, NY 10036
(212) 777-1150
LeNoble Lumber Co., Inc.
38-20 Review Ave, Long Island City, NY 11101
(212) 246-0150
Rosenzweig Lumber Corporation
801 E 135th St #1, Bronx, NY 10454
(718) 585-8050
Dykes Lumber
43-01 9th St, Long Island City, NY 11101
(718) 784-3920
I ended going to LeNoble Lumber Co. in LIC this morning, and it is an incredible warehouse full of every kind of wood you could think of. I got some Maple (most recommended for cutting boards), Red Oak, Sepale, and another kind I forget the name of which I will add to this post later [*Cherry], in a few different thicknesses, thinking ahead about making enclosures later this semester and also just about how difficult it was just to get the wood this time around and how it would be nice to have reserves...
Since the bandsaw may still be broken I might try to simplify the design to some square cutting boards which I will sand down.. Not sure without this if this satisfies the requirement of a multi step process -- I would cut it on the saw and then use the belt sander, and if the belt saw is working I would also use it to create rounded corners ideally, then also oil it them with a food safe mineral oil.
I did use the meter saw on a project that I abandoned, and haven't found a reason to use the drill press for this yet...Also thought about making bookends in a more traditional way that screw together using dowels, so if the cutting boards don't work I will do that instead. I was just excited about making the cutting boards because I could use them as gifts, and I would also prefer to have one of those than the book ends! But am trying to think of a way I can add more steps to the cutting board, such as adding a juice trough, or a hole somewhere, especially if I am able to shape a handle onto it.
I'm now thinking of mostly following this tutorial... and finding a way to customize it somehow.
Update on 11/7:
I ended up making the cutting boards (which I am now calling cheese boards, because they are small!) Instead of using the band saw, which had been fixed, I discovered with some help from someone in the shop that I could use the left side of the more intense part of the belt sander (what is that called?) to chip or eat away at the wood, molding it into the cheese board shape after I cut it into 12" x 8" rectangles using the saw. I drew an outline in pencil on the boards and then started to sand away at them, pushing them in at a side hard angle to cut out the handles, which produced a lot of dust but not as much as I expected. I ended up using the Cherry wood (the one I forgot before) because I liked its grain and it seemed very high quality, and it was also recommended as one of the boards suitable for a cutting board, specifically I found a few cheese boards made with cherry wood. It felt like very fine wood and was easy to sculpt with the sander.
I spent around 2-3 hours in the shop to get them to this point, planning them out and using the saw and the sander:

And another hour or so refining them and making the handles smaller (I still think the handles could be a little thinner or more tapered, and maybe the boards a little larger ):
I sanded them down a bit more at home on the edges to remove rough parts that the belt sander couldn't get, and to smooth down the sides a little more.
I also tried sanding the surface of one of them just to get off any extra dust or anything like that, but decided that was a mistake. Thankfully I think I only scratched the surface of one of them.

After sanding them I decided they were as done as they are going to be before Thursday to allow me enough time to apply mineral oil and let it soak in, which felt like the final step, so I went ahead and added the first layer of oil (Boo's Block Mystery Oil):


I also forgot to mention I made a sixth one as an experiment with a thinner handle and generally a little smaller than the others.
I left the board oil on all day, then applied the bottom side coat at night after wiping off the excess oil to stay on overnight. Then I also will apply board cream, if there is time before Thursday, but definitely before using them or giving them as gifts. Overall I feel pretty happy with them! I was thinking I could also have drilled a hole in the handles for hanging them, but I was worried about messing them up after spending so much time sanding them and also ran out of time. I also could have made the handle thinner in the middle like the first boards I was looking at, and/or added an inscription or image on the handle like a piece of cheese. But I also think they are simple and something of their own as they are.
Day 60 @ ITP: Appl Interactive Telecommunication Systems
Lecture with Sigi Moeslinger of Antenna Design:

Our presentation group (Lin Z., Caleb F., Meng Zhen X., Yu Hao K. and myself) is currently working on a presentation for next week based on this lecture... I wanted to ask Sigi but didn't think to in time about what other cities in the world she has visited or observed that are are more open to public art and interaction design in a more permanent way. My guesses would be Scandinavian major cities and also in Japan, but also possibly Berlin, and/or somewhere else I haven't thought of yet. I would be curious to try some kind of temporary public installation somewhere, eyes set on a pop-up in Berlin or another kind of installation or event in Lisbon with a friend there, after figuring out some technical aspects and also finding a right time and place to work with people on it.
Update on 11/13: Here is our presentation! I'm a little embarrassed showing this in public but it's also presented with a grain of salt (and I got to do my best impression of a British accent, which I also repeated for my English mother later. She said it "wasn't bad.") We started with thinking about things we wished existed but didn't yet, and ended up here. The videos are shown courtesy of our classmates who made them as their final projects for Video and Sound Comm Lab earlier in the semester, one of which Lin was part of, which we showcase for our fake "Sharky Tanky" product pitches. It seemed to tie together also with the speaker for the week, Foursquare founder Dennis Crowley, who emphasized how you should just go ahead and work on making an idea a reality even if it seems unlikely or crazy to people, and eventually it could catch on (possibly after many failed attempts), which seems to be what happened for him with his various iterations of Foursquare and how it would work based on currently available technologies.
Day 58 @ ITP: Animation
12 Basic Principles of Animation

- Squash and stretch
- Anticipation
- Staging
- Straight Ahead Action and Pose to Pose
- Follow Through and Overlapping Action
- Slow In and Slow Out
- Arcs
- Secondary Action
- Timing
- Exaggeration
- Solid Drawing (same or different as Weight)
- Appeal
#1 SQUASH AND STRETCH
This action gives the illusion of weight and volume to a character as it moves. Also squash and stretch is useful in animating dialogue and doing facial expressions. How extreme the use of squash and stretch is, depends on what is required in animating the scene. Usually it's broader in a short style of picture and subtler in a feature. It is used in all forms of character animation from a bouncing ball to the body weight of a person walking. This is the most important element you will be required to master and will be used often.
#2 ANTICIPATION
This movement prepares the audience for a major action the character is about to perform, such as, starting to run, jump or change expression. A dancer does not just leap off the floor. A backwards motion occurs before the forward action is executed. The backward motion is the anticipation. A comic effect can be done by not using anticipation after a series of gags that used anticipation. Almost all real action has major or minor anticipation such as a pitcher's wind-up or a golfers' back swing. Feature animation is often less broad than short animation unless a scene requires it to develop a characters personality.
#3 STAGING
A pose or action should clearly communicate to the audience the attitude, mood, reaction or idea of the character as it relates to the story and continuity of the story line. The effective use of long, medium, or close up shots, as well as camera angles also helps in telling the story. There is a limited amount of time in a film, so each sequence, scene and frame of film must relate to the overall story. Do not confuse the audience with too many actions at once. Use one action clearly stated to get the idea across, unless you are animating a scene that is to depict clutter and confusion. Staging directs the audience's attention to the story or idea being told. Care must be taken in background design so it isn't obscuring the animation or competing with it due to excess detail behind the animation. Background and animation should work together as a pictorial unit in a scene.
#4 STRAIGHT AHEAD AND POSE TO POSE ANIMATION
Straight ahead animation starts at the first drawing and works drawing to drawing to the end of a scene. You can lose size, volume, and proportions with this method, but it does have spontaneity and freshness. Fast, wild action scenes are done this way. Pose to Pose is more planned out and charted with key drawings done at intervals throughout the scene. Size, volumes, and proportions are controlled better this way, as is the action. The lead animator will turn charting and keys over to his assistant. An assistant can be better used with this method so that the animator doesn't have to draw every drawing in a scene. An animator can do more scenes this way and concentrate on the planning of the animation. Many scenes use a bit of both methods of animation.
#5 FOLLOW THROUGH AND OVERLAPPING ACTION
When the main body of the character stops all other parts continue to catch up to the main mass of the character, such as arms, long hair, clothing, coat tails or a dress, floppy ears or a long tail (these follow the path of action). Nothing stops all at once. This is follow through. Overlapping action is when the character changes direction while his clothes or hair continues forward. The character is going in a new direction, to be followed, a number of frames later, by his clothes in the new direction. "DRAG," in animation, for example, would be when Goofy starts to run, but his head, ears, upper body, and clothes do not keep up with his legs. In features, this type of action is done more subtly. Example: When Snow White starts to dance, her dress does not begin to move with her immediately but catches up a few frames later. Long hair and animal tail will also be handled in the same manner. Timing becomes critical to the effectiveness of drag and the overlapping action.
#6 SLOW-OUT AND SLOW-IN
As action starts, we have more drawings near the starting pose, one or two in the middle, and more drawings near the next pose. Fewer drawings make the action faster and more drawings make the action slower. Slow-ins and slow-outs soften the action, making it more life-like. For a gag action, we may omit some slow-out or slow-ins for shock appeal or the surprise element. This will give more snap to the scene.
#7 ARCS
All actions, with few exceptions (such as the animation of a mechanical device), follow an arc or slightly circular path. This is especially true of the human figure and the action of animals. Arcs give animation a more natural action and better flow. Think of natural movements in the terms of a pendulum swinging. All arm movement, head turns and even eye movements are executed on an arcs.
#8 SECONDARY ACTION
This action adds to and enriches the main action and adds more dimension to the character animation, supplementing and/or re-enforcing the main action. Example: A character is angrily walking toward another character. The walk is forceful, aggressive, and forward leaning. The leg action is just short of a stomping walk. The secondary action is a few strong gestures of the arms working with the walk. Also, the possibility of dialogue being delivered at the same time with tilts and turns of the head to accentuate the walk and dialogue, but not so much as to distract from the walk action. All of these actions should work together in support of one another. Think of the walk as the primary action and arm swings, head bounce and all other actions of the body as secondary or supporting action.
#9 TIMING
Expertise in timing comes best with experience and personal experimentation, using the trial and error method in refining technique. The basics are: more drawings between poses slow and smooth the action. Fewer drawings make the action faster and crisper. A variety of slow and fast timing within a scene adds texture and interest to the movement. Most animation is done on twos (one drawing photographed on two frames of film) or on ones (one drawing photographed on each frame of film). Twos are used most of the time, and ones are used during camera moves such as trucks, pans and occasionally for subtle and quick dialogue animation. Also, there is timing in the acting of a character to establish mood, emotion, and reaction to another character or to a situation. Studying movement of actors and performers on stage and in films is useful when animating human or animal characters. This frame by frame examination of film footage will aid you in understanding timing for animation. This is a great way to learn from the others.
#10 EXAGGERATION
Exaggeration is not extreme distortion of a drawing or extremely broad, violent action all the time. It's like a caricature of facial features, expressions, poses, attitudes and actions. Action traced from live action film can be accurate, but stiff and mechanical. In feature animation, a character must move more broadly to look natural. The same is true of facial expressions, but the action should not be as broad as in a short cartoon style. Exaggeration in a walk or an eye movement or even a head turn will give your film more appeal. Use good taste and common sense to keep from becoming too theatrical and excessively animated
#11 SOLID DRAWING
The basic principles of drawing form, weight, volume solidity and the illusion of three dimension apply to animation as it does to academic drawing. The way you draw cartoons, you draw in the classical sense, using pencil sketches and drawings for reproduction of life. You transform these into color and movement giving the characters the illusion of three-and four-dimensional life. Three dimensional is movement in space. The fourth dimension is movement in time.
#12 APPEAL
A live performer has charisma. An animated character has appeal. Appealing animation does not mean just being cute and cuddly. All characters have to have appeal whether they are heroic, villainous, comic or cute. Appeal, as you will use it, includes an easy to read design, clear drawing, and personality development that will capture and involve the audience's interest. Early cartoons were basically a series of gags strung together on a main theme. Over the years, the artists have learned that to produce a feature there was a need for story continuity, character development and a higher quality of artwork throughout the entire production. Like all forms of story telling, the feature has to appeal to the mind as well as to the eye.